웹팩(Webpack)으로 타입스크립트 & HTML Loader 환경 설정
Webpack으로 타입스크립트를 이용한 HTML 개발환경을 구축하는 방법은 다음과 같습니다.
일반 자바스크립트는 아래 글들을 참고하세요.
0. npm 프로젝트 생성
생성하고자 하는 디렉토리에서 터미널을 연 뒤 아래 명령어를 입력합니다.
1
npm init -y
1. 타입스크립트 설치
2. npm 모듈 설치
아래 요소들을 추가합니다.
1
npm i @babel/cli @babel/core @babel/polyfill @babel/preset-env @types/react @types/react-dom  awesome-typescript-loader babel-loader css-loader file-loader html-webpack-plugin mini-css-extract-plugin style-loader typescript url-loader webpack webpack-cli webpack-dev-server --save-dev
3. Webpack-cli, Webpack-dev 버전 변경
Webpack 5의 경우, 버전 충돌 오류로 Error: Cannot find module ‘webpack-cli/bin/config-yargs’ 에러가 발생할 수 있습니다. 이것을 방지하기 위해 package.json 에서 아래 모듈의 버전을 변경합니다.
1
2
3
4
{
  “webpack-cli”: “3.3.11”,
  “webpack-dev-server”: “3.7.1”
}
터미널에서 아래 명령어들을 실행해 모듈들을 다시 설치합니다.
1
2
3
$ rm -rf node_modules // node_modules 폴더삭제
$ rm package-lock.json // package-lock.json 파일삭제
$ npm install // 노드모듈 인스톨
4. webpack.config.js 생성 후 설정 정보 입력하기
개인적으로 맨땅에서 웹팩 프로젝트를 생성하는 것이 어렵게 느껴지는 이유가 웹팩을 설치한다고 해서 config 파일을 자동으로 만들어주는 것은 아니기 때문입니다.
1
2
3
4
5
6
7
8
9
10
11
12
13
14
15
16
17
18
19
20
21
22
23
24
25
26
27
28
29
30
31
32
33
34
35
36
37
38
39
40
41
42
43
44
45
46
47
48
49
50
51
52
53
54
55
56
57
58
59
60
61
const HtmlWebpackPlugin = require("html-webpack-plugin");
const MiniCssExtractPlugin = require("mini-css-extract-plugin");
const path = require("path");

const basePath = __dirname;

module.exports = {
  context: path.join(basePath, "src"),
  resolve: {
    extensions: [".js", ".ts", ".tsx"]
  },
  entry: ["@babel/polyfill", "./index.ts"],
  output: {
    path: path.join(basePath, "dist"),
    filename: "bundle.js"
  },
  devtool: "source-map",
  devServer: {
    contentBase: "./dist", // Content base
    inline: true, // Enable watch and live reload
    host: "localhost",
    port: 8080,
    stats: "errors-only"
  },
  module: {
    rules: [
      {
        test: /\.(ts|tsx)$/,
        exclude: /node_modules/,
        loader: "awesome-typescript-loader",
        options: {
          useBabel: true,
          babelCore: "@babel/core" // needed for Babel v7
        }
      },
      {
        test: /\.css$/,
        use: [MiniCssExtractPlugin.loader, "css-loader"]
      },
      {
        test: /\.(png|jpg|gif|svg)$/,
        loader: "file-loader",
        options: {
          name: "assets/img/[name].[ext]?[hash]"
        }
      }
    ]
  },
  plugins: [
    //Generate index.html in /dist => https://github.com/ampedandwired/html-webpack-plugin
    new HtmlWebpackPlugin({
      filename: "index.html", //Name of file in ./dist/
      template: "index.html", //Name of template in ./src
      hash: true
    }),
    new MiniCssExtractPlugin({
      filename: "[name].css",
      chunkFilename: "[id].css"
    })
  ]
};
html-webpack-plugin- 번들링된 CSS, JS 파일들을 HTML에 자동으로 부착시킵니다. (index.html작성 시 별도의<script>태그 작성이 필요 없습니다.)mini-css-extract-plugin- CSS를 추출해서 파일로 저장하는 플러그인입니다.extensions-extensions에 넣은 확장자들은 웹팩에서 알아서 처리해주기 때문에 파일에 해당 확장자들을 입력할 필요가 없어집니다. 예를 들어App.js라는 파일을 임포트할 때import App from './App'처럼 확장자 없이 불러올 수 있는것은 이것 덕분입니다.entry: ["@babel/polyfill", "./index.ts"]-entry는 웹팩이 빌드할 파일을 알려주는 역할을 합니다. 타입스크립트를 사용할 것이므로ts확장자의 파일을src디렉토리에 넣습니다.context: path.join(basePath, "src")- 위에서src폴더에 넣는 이유는 기본 디렉토리가src로 지정되어 있기 때문입니다.@babel/polyfill-babel처럼 단순 문법 변환으로는 구현이 어려운 ES2015의 새로운 객체(Promise,Map,Set등등)과 메소드(Array.find,Object.assign등등)를 사용하기 위해babel/polyfill을 사용합니다.output- 웹팩이 어디에 번들을 만들어 낼 것인지, 어떤이름으로 파일들을 어떻게 만들것인지에 대해서 지정합니다..filename: "bundle.js"-output안에서filename은 번들링 돼서 나온 결과 파일을 말합니다.devtool: "source-map"- SourceMaps을 생성할지 말지를 결정하는 옵션입니다. 에러가 발생할 때, 어느 부분에서 에러가 발생했는지 알아야 디버깅이 수월합니다. source map은 bundle된 코드에서 발생한 에러를 기존의 코드와 연결시켜주는 역할을 합니다.devServer- 빠른 실시간 리로드 기능을 갖춘 개발 서버입니다. 디스크에 저장되지 않는 메모리 컴파일을 사용하기 때문에 컴파일 속도가 빨라집니다.webpack.config.js에도devServer옵션을 통해 옵션을 지정하여 사용이 가능합니다.exclude: /node_modules/- exclude는 제외할 폴더나 파일로, 바벨로 컴파일하지 않을 것들을 지정해줍니다. 바벨로는 컴파일하지 않지만 웹팩으로는 컴파일합니다. 반대로include로 꼭 이 로더를 사용해서 컴파일할 것들을 지정해줄 수도 있습니다.loader: "awesome-typescript-loader"- 타입스크립트를 컴파일링 할 때awesome-typescript-loader를 사용하겠다고 지정합니다.
5. 루트 디렉토리에 .babelrc 파일을 생성합니다.
1
2
3
4
5
6
7
8
9
10
{
  "presets": [
    [
      "@babel/preset-env",
      {
        "useBuiltIns": "entry"
      }
    ]
  ]
}
6. package.json 의 스크립트 부분에 다음 부분을 추가합니다.
1
2
3
4
"scripts": {
  "dev": "webpack-dev-server --hot --inline",
  "build": "webpack --mode production"
},
터미널에서 npm run XXX 로 입력해서 실행할 때 스크립트를 작성합니다. dev 는 개발시 localhost:8080으로 접속하면 파일을 저장할 때마다 변경 내용이 실시간으로 반영됩니다. build는 타입스크립트 파일들을 단일의 HTML+JS 파일로 컴파일해 dist 폴더에 내보냅니다.
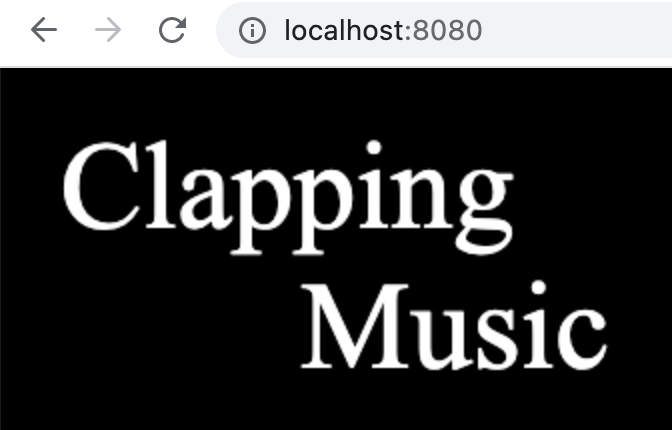
7. src 폴더에 index.ts, index.html 파일 생성하고 개발 시작
참고로 프로젝트 폴더 구조는 다음과 같습니다.

index.ts
1
2
import App from "./App"
document.getElementById("app")!.appendChild(App())
App.ts
1
2
3
4
5
6
7
8
9
10
11
12
13
14
15
16
17
export default function App() {
    const canvas: HTMLCanvasElement = document.createElement("canvas")
    canvas.width = window.innerWidth
    canvas.height = window.innerHeight - 5

    // draw canvas
    const ctx: CanvasRenderingContext2D = canvas.getContext("2d")!

    ctx.fillStyle = "black"
    ctx.fillRect(0, 0, canvas.width, canvas.height)
    ctx.font = '62px Times new roman'
    ctx.fillStyle = "white"
    ctx.fillText("Clapping", 30, 80)
    ctx.fillText("Music", 150, 150)

    return canvas
}
index.html
1
2
3
4
5
6
7
8
9
10
11
12
13
14
15
16
17
18
<!DOCTYPE html>
<html lang="en">
<head>
    <meta charset="UTF-8">
    <meta name="viewport" content="width=device-width, initial-scale=1.0">
    <title>Document</title>
    <style>
        body {
            margin: 0;
            padding: 0;
        }
    </style>
</head>
<body>
    <div id="app">
    </div>
</body>
</html>
출처
This post is licensed under
CC BY 4.0
by the author.