iOS 프로그래밍: 컬렉션 뷰 (Swift, 스토리보드) – 컬렉션 뷰 추가, 커스텀 셀 작성
컬렉션 뷰란?
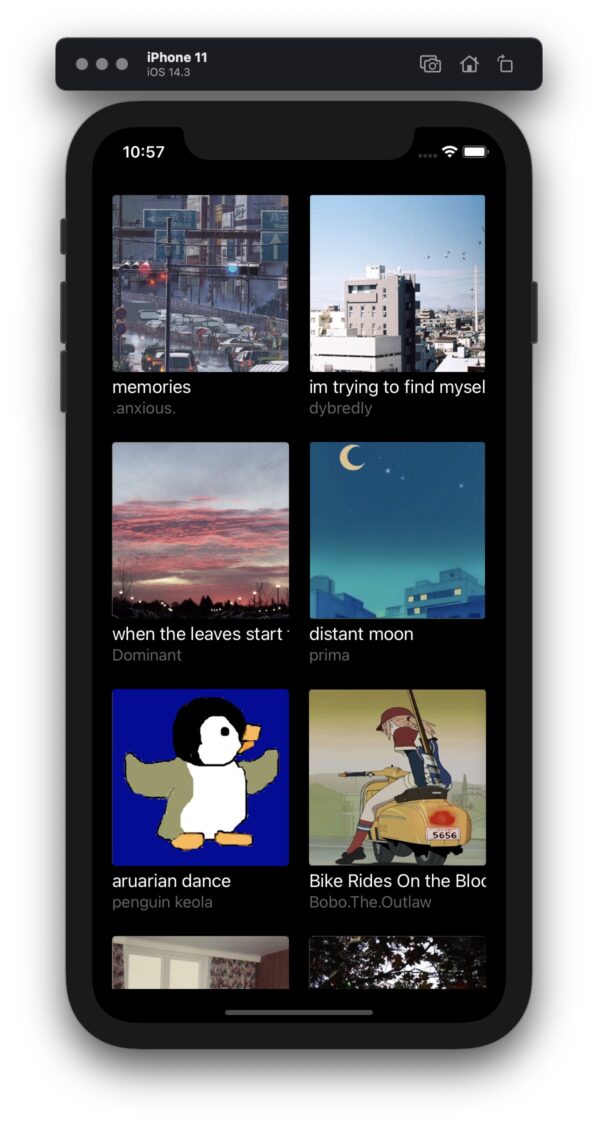
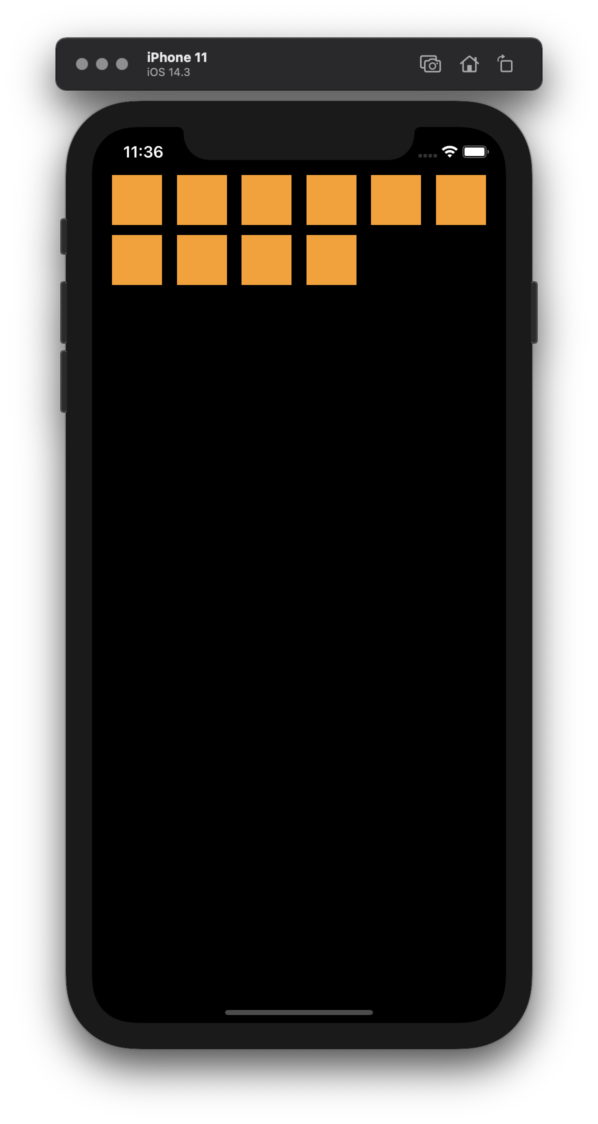
컬렉션 뷰(Collection View)란 위의 그림에서 볼 수 있듯이 테이블처럼 일정한 가로 세로 개수를 가진 목록 오브젝트를 뜻합니다. 이 테이블 뷰를 생성하는 방법을 스위프트(Swift), UIKit 스토리보드(Storyboard) 기준으로 알아보겠습니다.
컬렉션 뷰 만들기
1) 컬렉션 뷰(Collection View) 오브젝트 추가
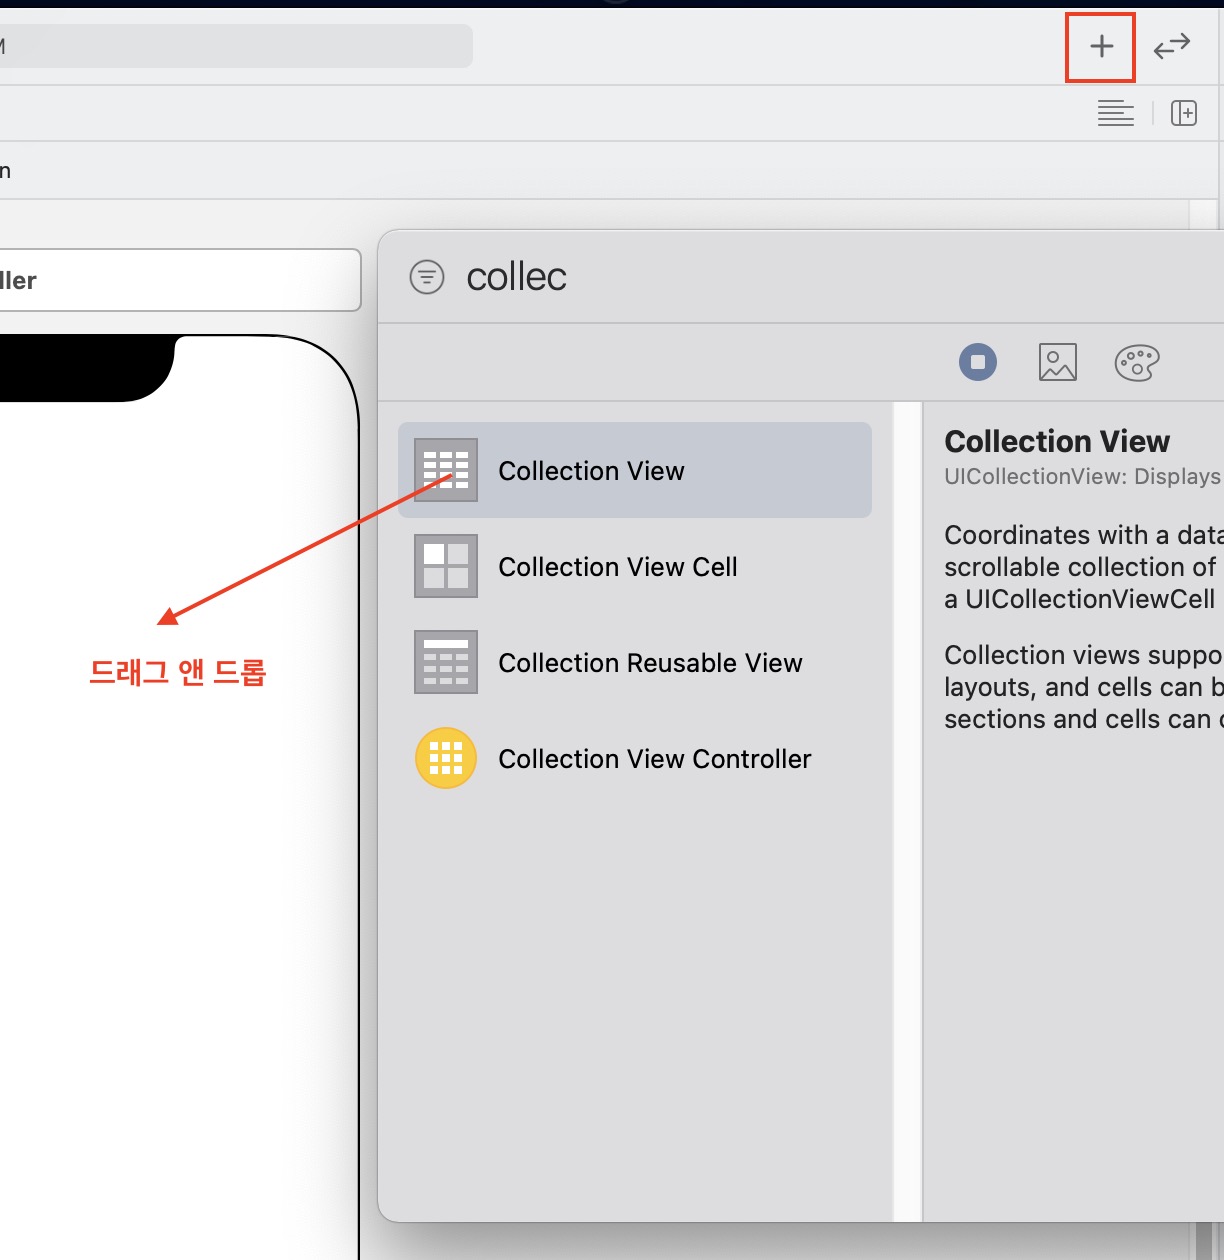
- 오른쪽 상단의
[+]버튼을 클릭합니다. Collection View오브젝트를 메인 뷰로 끌어와 추가합니다.
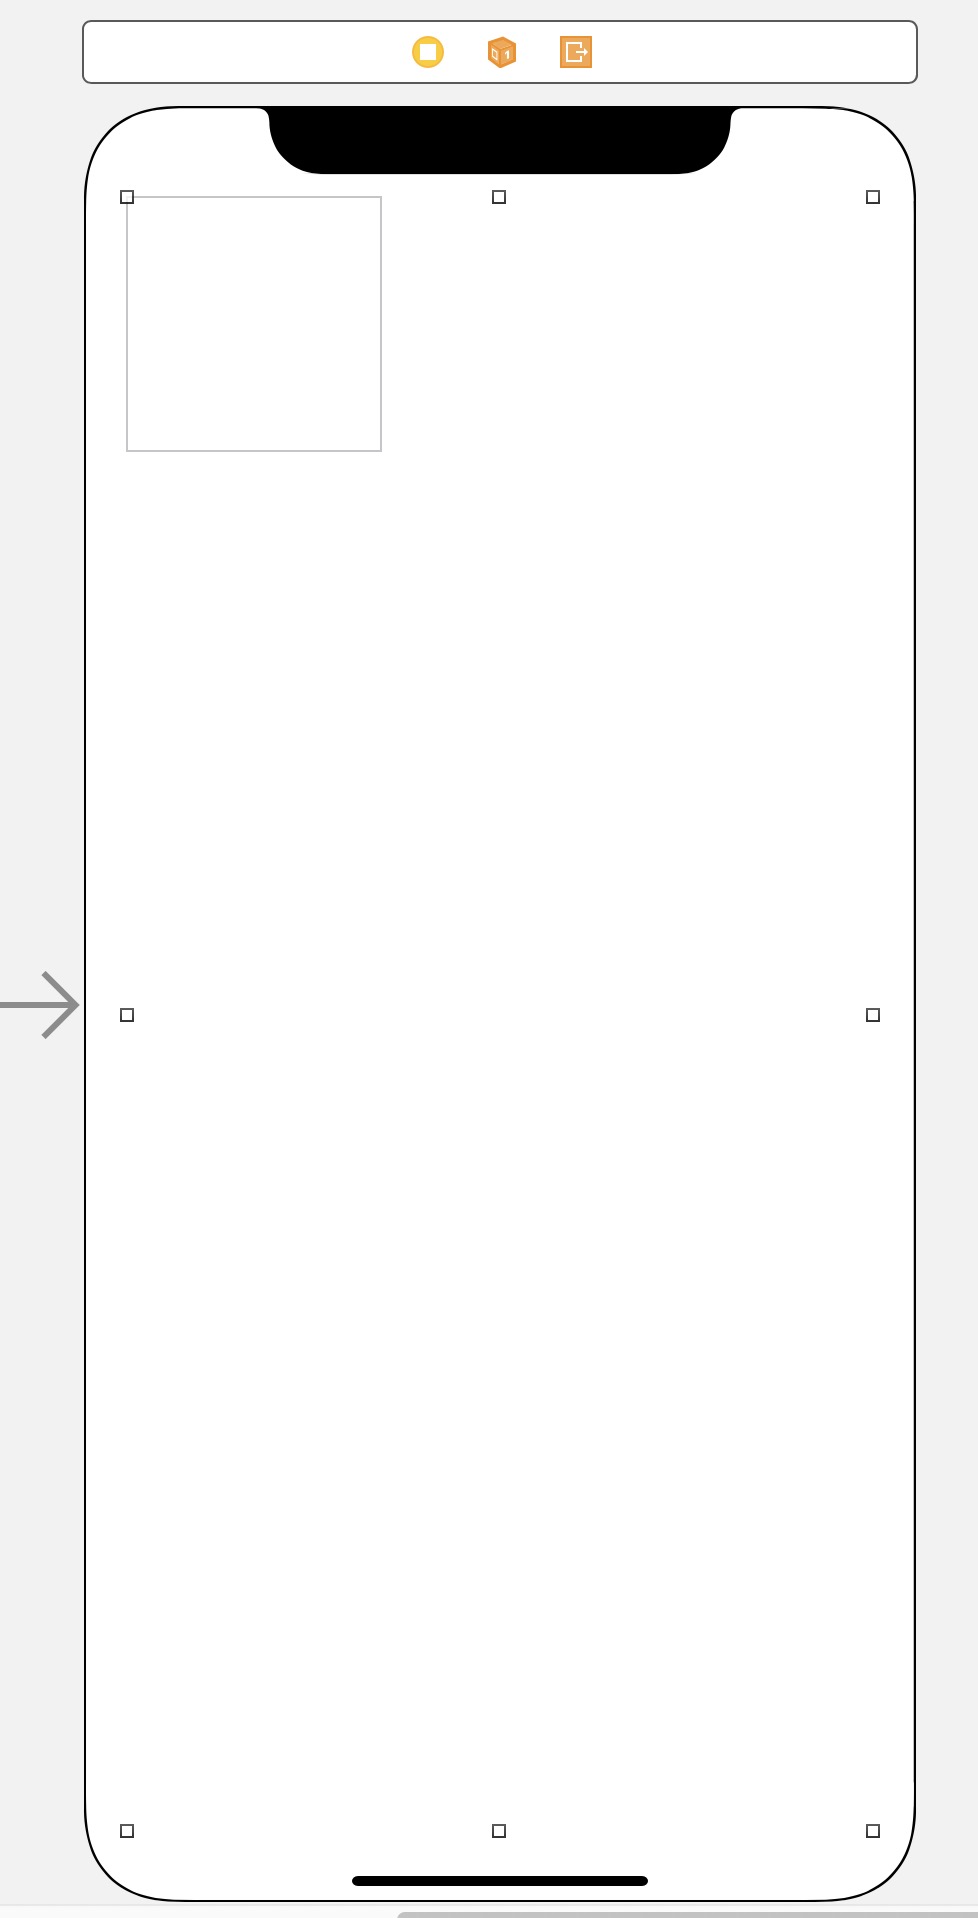
- 컬렉션 뷰를 양쪽으로 잡아당겨 화면에 꽉 채웁니다.
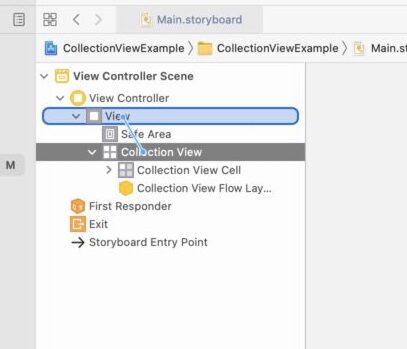
2) 컬렉션 뷰에 오토 레이아웃 설정
-
컬렉션 뷰를
마우스 오른쪽버튼 또는control + 마우스 왼쪽버튼을 누른 채로View(위 그림의 파란색 영역)으로 드래그합니다.
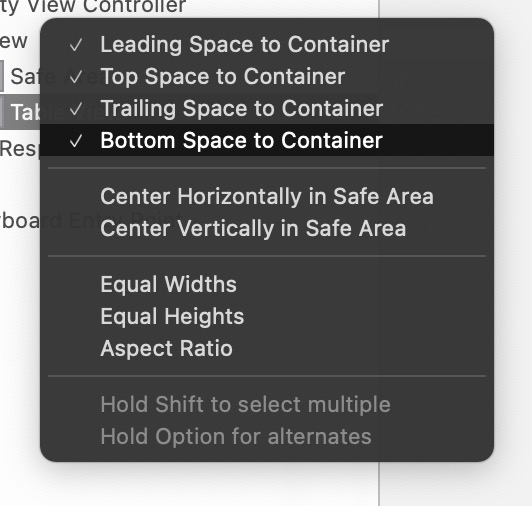
-
shift버튼을 누른 채 메뉴를 클릭해 위의 그림처럼 체크박스를 표시합니다. 이후 제약(constraints)가 생기며 자동 레이아웃이 설정됩니다.
3) 뷰 컨트롤러에서 UICollectionViewDataSource, UICollectionViewViewDelegate 프로토콜 상속받기
먼저 컬렉션 뷰를 표시하기 위해 컨트롤러에서 반드시 제공해야 하는 정보가 2가지 있습니다.
-
컬렉션 뷰의 셀은 총 몇 개? (
UICollectionViewDataSource) -
컬렉션 뷰를 어떻게 보여줄 것인가 ? (
UICollectionViewDelegate)
이러한 정보를 제공하기 위해 UICollectionViewDataSource, UICollectionViewDelegate 프로토콜을 구현해야 합니다. 뷰 컨트롤러 클래스의 최상단 부분에 다음 두 개 프로토콜을 추가합니다.
1
2
3
4
5
6
7
8
9
10
11
12
import UIKit

class ViewController: UIViewController,
                      UICollectionViewDataSource,
                      UICollectionViewDelegate {

    override func viewDidLoad() {
        super.viewDidLoad()
        // Do any additional setup after loading the view.
    }

}
위 부분을 추가하면 아래와 같은 에러가 발생할 것입니다.[Fix] 버튼을 눌러 프로토콜 조각(protocol stub)을 추가합니다. 
눌렀다면 다음 부분이 추가될 것입니다.
1
2
3
4
5
6
7
func collectionView(_ collectionView: UICollectionView, numberOfItemsInSection section: Int) -> Int {
    // ... code ...
}

func collectionView(_ collectionView: UICollectionView, cellForItemAt indexPath: IndexPath) -> UICollectionViewCell {
    // ... code ...
}
두 함수 모두 UICollectionViewDataSource와 관련된 부분입니다.
첫 번째 함수는 콜렉션 뷰에 총 몇 개의 셀(cell)을 표시할 것인지를 구현합니다. Int 값을 리턴하라고 나와 있으므로 return 10 등으로 작성합니다.
두 번째 함수는 해당 cell에 무슨 셀을 표시할 지를 결정합니다. UICollectionViewCell을 리턴하라고 합니다.
예제 코드를 작성하면 아래와 같습니다.
1
2
3
4
5
6
7
8
9
10
11
12
func collectionView(_ collectionView: UICollectionView, numberOfItemsInSection section: Int) -> Int {
    return 10
}

func collectionView(_ collectionView: UICollectionView, cellForItemAt indexPath: IndexPath) -> UICollectionViewCell {
    guard let cell = collectionView.dequeueReusableCell(withReuseIdentifier: "cell", for: indexPath) as?
            UICollectionViewCell else {
        return UICollectionViewCell()
    }

    return cell
}
dequeReusableCell은 재활용 가능한 셀을 큐(queue)의 형태로 추가/제거합니다. 만약 재사용 큐에 셀이 존재한다면 현재 재사용 큐에 있는 셀을dequeue(꺼냄)해주고, 재사용 큐에 셀이 없으면 새로운 셀을 생성합니다.for:는 셀의 위치를 지정하는 색인 경로입니다. 항상 데이터 원본 개체에서 제공하는 인덱스 경로를 지정해야 합니다.indexPath를 적으면 됩니다.cell:은 아까 추가한 테이블 뷰 셀의 구분자(identifier)를 적는 곳입니다. 이 구분자를 통해 셀을 가져오고 그 셀을 재활용합니다. 구분자 추가 방법은 밑에서 설명하겠습니다.
4) 컬렉션 뷰 셀에 구분자(identifier) 추가
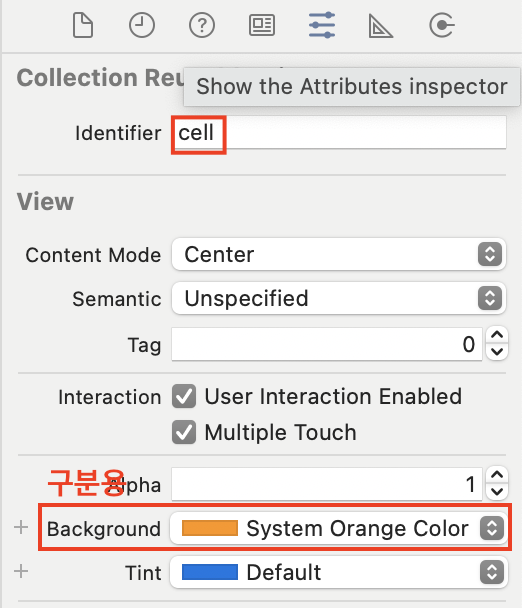
- 메인 스토리보드에서 컬렉션 뷰 셀을 선택한 뒤, 오른쪽에서
Show the Attributes Inspector(위 그림의 빨간 박스 아이콘)를 선택한 뒤,Identifier에 아까 프로토콜 조각에서 지정했던cell구분자를 입력합니다. - 셀이 표시되는지 구분하기 위해
Background에 색상을 추가합니다.
5) 컬렉션 뷰와 메인 뷰 컨트롤러에 Datasource, Delegate 연결
- 테이블 뷰에서
control + 마우스 왼쪽또는마우스 오른쪽버튼을 이용에 파란색 영역(View Controller)으로 드래그합니다.
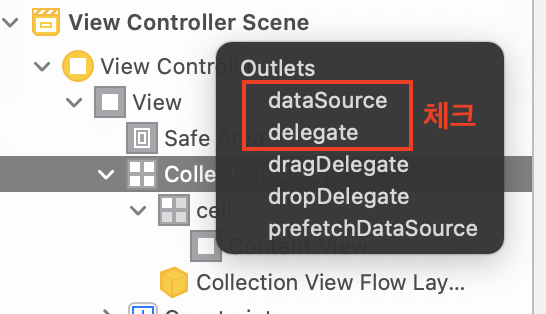
- 위와 같은 메뉴가 나타나는데
dataSource,delegate메뉴를 클릭하여 체크해줍니다.

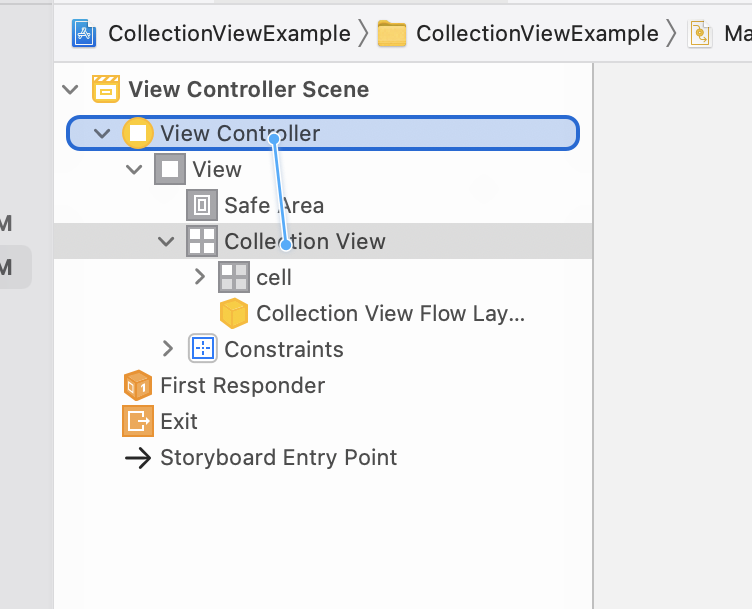
- 컬렉션 뷰를 선택한 다음 오른쪽 옵션 창에서
Show the Connection Inspector버튼을 클릭해 위와 같이 연결되었는지 확인합니다.
동작 확인
심화 내용
추가1) 커스텀 셀 작성
커스텀 셀의 작성 원리는 iOS 프로그래밍: 테이블 뷰 (Swift, 스토리보드) 2 - 커스텀 셀(custom cell) 추가 에서 나온 것과 매우 유사합니다. 이 부분의 내용을 알고 있다고 가정하고 설명하겠습니다.
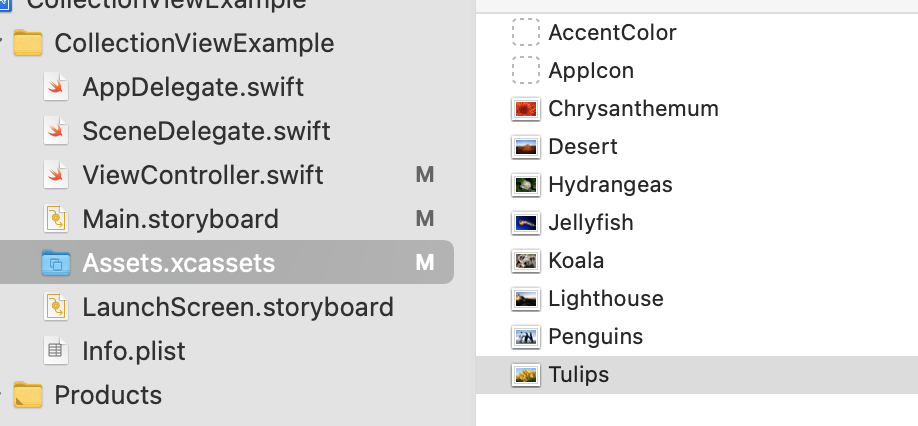
먼저 Assets.xcassets에 사진 파일들을 저장합니다.
컬렉션 뷰 내의 셀의 사이즈를 조정하고, Image 오브젝트와 Label 오브젝트를 추가합니다.
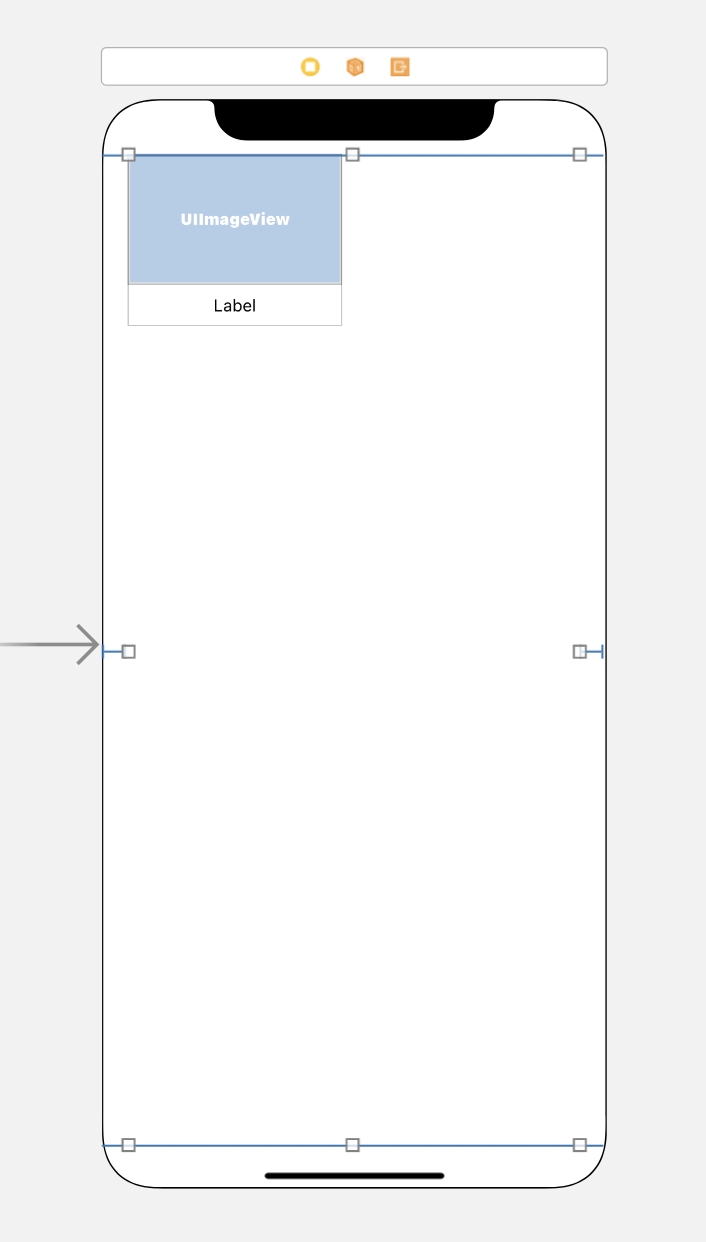
사이즈를 작성한 뒤, 새로운 클래스를 생성합니다.
1
2
3
4
5
6
7
8
9
class Cell: UICollectionViewCell {
    @IBOutlet weak var imgView: UIImageView!
    @IBOutlet weak var nameLabel: UILabel!

    func update(info: PictureInfo) {
        imgView.image = info.image
        nameLabel.text = info.name
    }
}
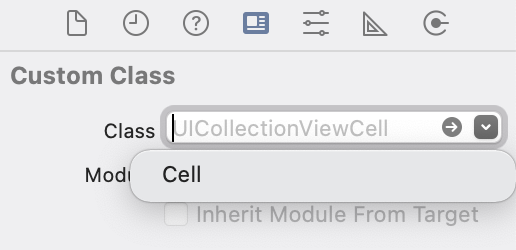
커스텀 셀을 선택한 후, Identity Inspector 메뉴에서 Class 를 위에서 작성한 Cell 클래스로 지정합니다.
메인 스토리보드에서 Assistant를 활성화한 뒤, 오브젝트와 @IBOutlet 을 연결합니다.

다음, ImageInfo 구조체를 생성합니다.
1
2
3
4
5
6
7
8
9
10
11
12
struct ImageInfo {
    let name: String

    var image: UIImage? {
        return UIImage(named: "\(name).jpg")
    }

    init (name: String) {
        self.name = name
    }
}
이미지 데이터를 담는 ViewModel을 생성합니다.
1
2
3
4
5
6
7
8
9
10
11
12
13
14
15
16
17
18
19
20
// view model
class ImageViewModel {
    let imageInfoList: [ImageInfo] = [
        ImageInfo(name: "Chrysanthemum"),
        ImageInfo(name: "Desert"),
        ImageInfo(name: "Hydrangeas"),
        ImageInfo(name: "Koala"),
        ImageInfo(name: "Lighthouse"),
        ImageInfo(name: "Penguins"),
        ImageInfo(name: "Tulip"),
    ]

    var countOfImageList: Int {
        return imageInfoList.count
    }

    func imageInfo(at index: Int) -> ImageInfo {
        return imageInfoList[index]
    }
}
컬렉션 뷰 표시와 관련된 코드를 편집합니다.
1
2
3
4
5
6
7
8
9
10
11
12
13
14
15
16
17
18
19
20
21
22
let viewModel = ImageViewModel() // 뷰모델 변수를 추가

func collectionView(_ collectionView: UICollectionView, numberOfItemsInSection section: Int) -> Int {
    return viewModel.countOfImageList // 뷰모델에서 카운트 가져옴
}

func collectionView(_ collectionView: UICollectionView, cellForItemAt indexPath: IndexPath) -> UICollectionViewCell {
    guard let cell = collectionView.dequeueReusableCell(withReuseIdentifier: "cell", for: indexPath) as?
            Cell else {
        return UICollectionViewCell()
    }

    let imageInfo = viewModel.imageInfo(at: indexPath.item) // indexPath.item을 기준으로 뷰모델에서 ImageInfo 가져옴
    cell.update(info: imageInfo) // 해당 셀을 업데이트
    return cell

}

// 셀이 선택되었을 때
func collectionView(_ collectionView: UICollectionView, didSelectItemAt indexPath: IndexPath) {
    print(indexPath.row)
}
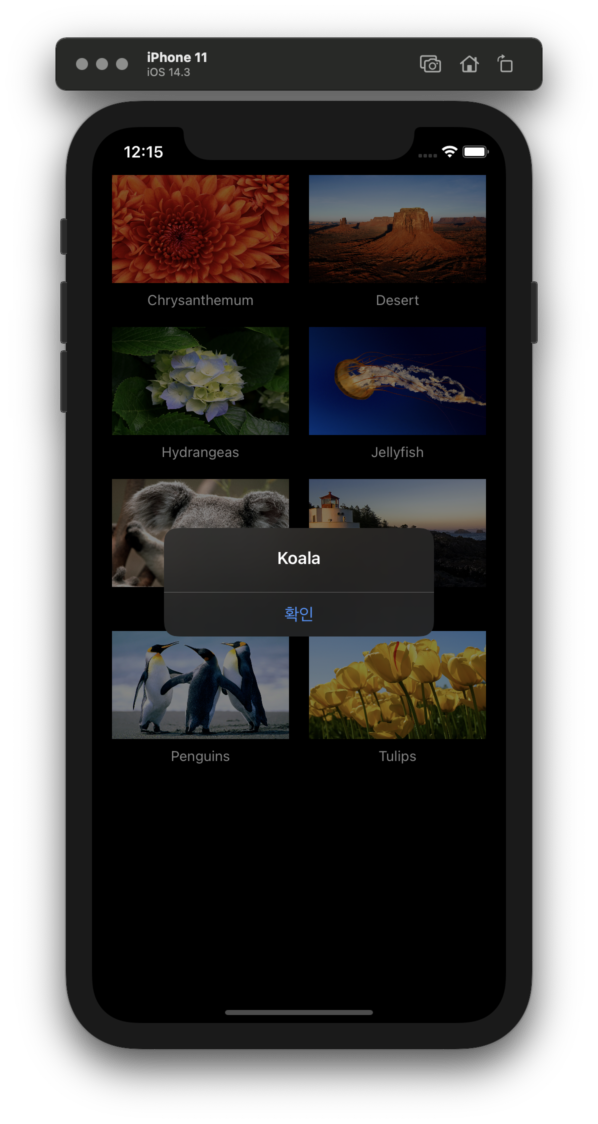
그리고 마지막으로 해당 셀을 클릭하면, 파일 이름이 나오는 경고창을 만들어 보도록 하겠습니다.
1
2
3
4
5
6
7
8
9
10
11
12
13
// 셀이 선택되었을 때
func collectionView(_ collectionView: UICollectionView, didSelectItemAt indexPath: IndexPath) {

    let imageInfo = viewModel.imageInfo(at: indexPath.item)

    let dialog = UIAlertController(title: "\(imageInfo.name)", message: "", preferredStyle: .alert)
    let action = UIAlertAction(title: "확인", style: UIAlertAction.Style.default)

    dialog.addAction(action)

    self.present(dialog, animated: true, completion: nil)

}
이것들을 종합한 ViewController.swift의 내용은 다음과 같습니다.
1
2
3
4
5
6
7
8
9
10
11
12
13
14
15
16
17
18
19
20
21
22
23
24
25
26
27
28
29
30
31
32
33
34
35
36
37
38
39
40
41
42
43
44
45
46
47
48
49
50
51
52
53
54
55
56
57
58
59
60
61
62
63
64
65
66
67
68
69
70
71
72
73
74
75
76
77
78
79
80
81
82
83
84
85
86
87
88
89
90
import UIKit

struct ImageInfo {
    let name: String

    var image: UIImage? {
        return UIImage(named: "\(name).jpg")
    }

    init (name: String) {
        self.name = name
    }
}

class ViewController: UIViewController,
                      UICollectionViewDataSource,
                      UICollectionViewDelegate {

    let viewModel = ImageViewModel() // 뷰모델 변수를 추가합니다.

    func collectionView(_ collectionView: UICollectionView, numberOfItemsInSection section: Int) -> Int {
        return viewModel.countOfImageList // 뷰모델에서 카운트 가져옴
    }

    func collectionView(_ collectionView: UICollectionView, cellForItemAt indexPath: IndexPath) -> UICollectionViewCell {
        guard let cell = collectionView.dequeueReusableCell(withReuseIdentifier: "cell", for: indexPath) as?
                Cell else {
            return UICollectionViewCell()
        }

        let imageInfo = viewModel.imageInfo(at: indexPath.item) // indexPath.item을 기준으로 뷰모델에서 ImageInfo 가져옴
        cell.update(info: imageInfo) // 해당 셀을 업데이트
        return cell

    }

    // 셀이 선택되었을 때
    func collectionView(_ collectionView: UICollectionView, didSelectItemAt indexPath: IndexPath) {

        let imageInfo = viewModel.imageInfo(at: indexPath.item)

        let dialog = UIAlertController(title: "\(imageInfo.name)", message: "", preferredStyle: .alert)
        let action = UIAlertAction(title: "확인", style: UIAlertAction.Style.default)

        dialog.addAction(action)

        self.present(dialog, animated: true, completion: nil)

    }

    override func viewDidLoad() {
        super.viewDidLoad()
        // Do any additional setup after loading the view.
    }

}

class Cell: UICollectionViewCell {
    @IBOutlet weak var imgView: UIImageView!
    @IBOutlet weak var nameLabel: UILabel!

    func update(info: ImageInfo) {
        imgView.image = info.image
        nameLabel.text = info.name
    }

}

// view model
class ImageViewModel {
    let imageInfoList: [ImageInfo] = [
        ImageInfo(name: "Chrysanthemum"),
        ImageInfo(name: "Desert"),
        ImageInfo(name: "Hydrangeas"),
        ImageInfo(name: "Jellyfish"),
        ImageInfo(name: "Koala"),
        ImageInfo(name: "Lighthouse"),
        ImageInfo(name: "Penguins"),
        ImageInfo(name: "Tulips"),
    ]

    var countOfImageList: Int {
        return imageInfoList.count
    }

    func imageInfo(at index: Int) -> ImageInfo {
        return imageInfoList[index]
    }
}
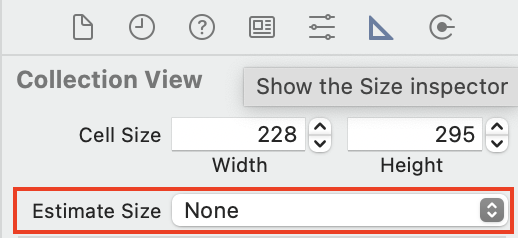
추가2) 디바이스 크기에 따른 셀 사이즈 조정 예제
크기를 임의로 조정하려면 뷰 컨트롤러 클래스에 UICollectionViewDelegateFlowLayout 를 추가하고 스토리보드에서 컬렉션 뷰의 Estimate Size 를 None으로 설정합니다.
case 1 - 가로 2칸, 기기 사이즈에 맞추기
1
2
3
4
5
6
7
8
9
10
// 사이즈 결정
func collectionView(_ collectionView: UICollectionView, layout collectionViewLayout: UICollectionViewLayout, sizeForItemAt indexPath: IndexPath) -> CGSize {

    let itemSpacing: CGFloat = 10
    let textAreaHeight: CGFloat = 65

    let width: CGFloat = (collectionView.bounds.width - itemSpacing) / 2
    let height: CGFloat = width * 10/7 + textAreaHeight
    return CGSize(width: width, height: height)
}
case 2 - 가로 세로 칸수를 정하고 싶을 때 (출처)
1
let sectionInsets = UIEdgeInsets(top: 10, left: 10, bottom: 10, right: 10)
1
2
3
4
5
6
7
8
9
10
11
12
13
func collectionView(_ collectionView: UICollectionView, layout collectionViewLayout: UICollectionViewLayout, sizeForItemAt indexPath: IndexPath) -> CGSize {
    let width = collectionView.frame.width
    let height = collectionView.frame.height
    let itemsPerRow: CGFloat = 2
    let widthPadding = sectionInsets.left * (itemsPerRow + 1)
    let itemsPerColumn: CGFloat = 3
    let heightPadding = sectionInsets.top * (itemsPerColumn + 1)
    let cellWidth = (width - widthPadding) / itemsPerRow
    let cellHeight = (height - heightPadding) / itemsPerColumn

    return CGSize(width: cellWidth, height: cellHeight)

}