Java: 재귀 함수, 재귀 호출 (recursive call) + 예제(팩토리얼, 유클리드 호제법, 파일 폴더 탐색)
재귀 함수는 예를 들면 ‘꿈 속의 꿈’ 같은 것이다. 꿈에서 꿈을 꿔서 깨어났더니 또 꿈 꾸는 중이다 같은 그런 경우..
1
2
3
4
5
6
7
8
9
10
11
12
13
14
15
16
public class RecursiveDream {

  private static int dreamCount = 1;

  public static void doDream() {
    System.out.println(dreamCount++ + "...");

    // recursive call;
    doDream();
  }

  public static void main(String[] args) {
    doDream();
  }
}
1
2
3
4
5
6
7
8
5759...
5760...
5761...
5762...
Exception in thread "main" java.lang.StackOverflowError
at java.io.FileOutputStream.write(FileOutputStream.java:326)
at java.io.BufferedOutputStream.flushBuffer(BufferedOutputStream.java:82)
at java.io.BufferedOutputStream.flush(BufferedOutputStream.java:140)
이런 식으로 메소드(함수) 안에 자신을 또 다시 호출하는 명령을 넣어 무한 호출을 하게 된다. 여기서 일반적인 반복문과는 다르게 스택 오버플로가 발생하는데 그 이유는 재귀함수는 자신의 역할을 실행한 후 돌아갈 자리(주소)를 메모리의 스택이라는 곳에다 저장하기 때문이다. 스택을 지금 설명할 수는 없지만, 스택의 공간은 한정되어 있고 재귀호출이 실행되면서 돌아갈 주소를 계속 쌓아두다 스택이 꽉 차 더 이상 저장할 수 없을 때 저런 스택오버플로 같은 현상이 나타나는 것이다.
그러므로 재귀호출 사용시에는 적당한 선에서 재귀 호출이 중단될 수 있도록 종료 조건을 넣어야만 한다.
1
2
3
4
5
6
7
8
9
10
11
12
13
14
15
16
17
18
19
20
public class RecursiveDream {

  public static void doDream(int dreamCount) {
    System.out.println(dreamCount++ + "..." );

    // 100까지만 꾸도록..
    if(dreamCount > 100) {
      return;
    }

    // recursive call;
    doDream(dreamCount);
  }

  public static void main(String[] args) {
    doDream(1);

  }
}
1
2
3
4
5
6
7
94...
95...
96...
97...
98...
99...
100...
일반적인 작업들은 거의 반복문으로 다 커버가 가능하고, 성능 상에서도 반복문이 훨씬 낫기 때문에 거의 쓰이지 않지만 가끔 재귀호출이 코드 작성에 더 나은 경우도 있고, 특히 파일 구조나 XML 등의 트리 구조를 파싱할 때에는 재귀적 방법 아니고선 답이 없는 경우도 있으므로 알아두면 좋을 것이다.
1
2
3
4
5
6
7
8
9
10
11
12
13
14
15
16
17
18
19
20
21
22
23
24
25
26
27
28
29
30
31
32
33
34
35
36
37
38
import java.util.Scanner;

public class Factorial1 {

    public static void main(String[] args) {

    	try(Scanner s = new Scanner(System.in);){

            int n, fact, fact2;

            System.out.print("? ");
            n = s.nextInt();

            fact = factorial(n);
            fact2 = factorialOnRepeat(n);

            System.out.println(n + "의 누승(팩토리얼)은 " + fact + " 이다.");
            System.out.println(n + "의 누승(팩토리얼)은 " + fact2 + " 이다.");
    	}

    }

    public static int factorial(int n) {

        return (n > 0) ? n * factorial(n - 1) : 1;
    }

    public static int factorialOnRepeat(int n) {

    	int result = 1;
    	for(int i = 1; i <= n; i++) {
    		result *= i;
    	}
    	return result;
    }

}
1
2
3
? 10
10의 누승(팩토리얼)은 3628800 이다.
10의 누승(팩토리얼)은 3628800 이다.
삼항 연산자를 사용해 n이 0보다 크면 n 에다 n - 1을 계속 곱해나가다 n이 0이하가 되면 1을 리턴하면서 종료하는 예제이다. 재귀 함수의 단점이 코드의 내용을 이해하기가 어렵다는 것이다. 저 구조를 딱 봐서 어떻게 이해할수 있을까?
다음은 정보처리산업기사에서 출제된 문제이다. 다음 코드의 실행 결과는?
1
2
3
4
5
6
7
8
9
10
11
12
13
14
15
16
17
public class RecursiveExample {

    public static int recursive(int n) {
        int i;
        if (n < 1)    return 2;
        else {
            i = (2 * recursive(n - 1)) + 1;
            System.out.printf("%d\n", i);
            return i;
        }
    }

    public static void main(String[] args) {
        recursive(8);
    }

}
1
2
3
4
5
6
7
8
9
10
답:

2
5
11
23
47

(...)
recursive(n-1) 부분이 계속 호출되면서 값을 반환한다. 최후 입력값(0)부터 recursive 함수(메소드) 자체에 반환된 값을 대입해 결과를 연쇄적으로 나열하면 된다.
n이 0인 경우 2를 리턴하고 재귀함수가 없으므로 0 밑으로는 더 이상 진행되지 않는다.
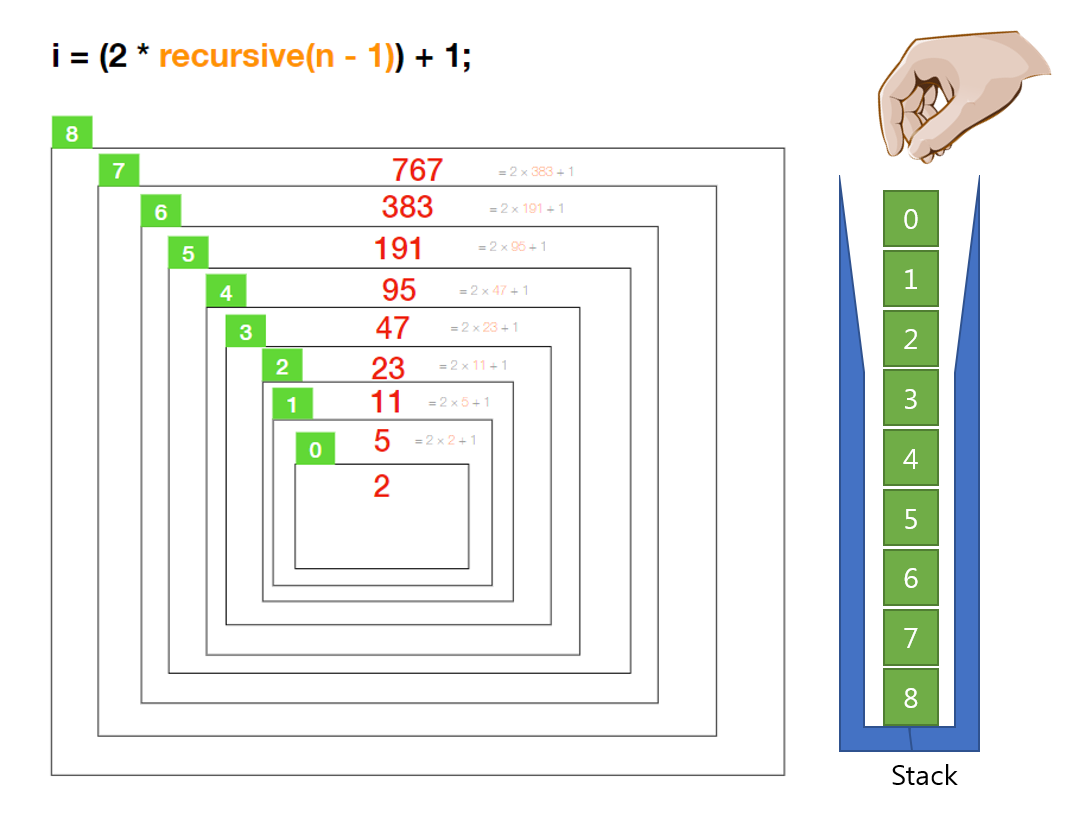
초록색을 주소값이라고 가정하고 그 주소값들을 스택에 쌓은 뒤 0이 되면 스택에 쌓인 주소값들을 다시 꺼내면서 실행한다. 0번 주소값에서는 2를 리턴하라고 했으므로 2이고 그 리턴된 값이 다시 재사용되어 다음 스택에서는 5가 리턴되고, 그 다음은 11이 되고 그런식으로…
다음은 관련 예제들이다.
1
2
3
4
5
6
7
8
9
10
11
12
13
14
15
16
17
18
19
20
21
22
import java.util.Scanner;

public class P63_GCD {

    // 최대공약수(The Greatest Common Denominator)
    public static int gcd(int x, int y) {
        if (y == 0) return x;
        return gcd(y, x%y);
    }

    public static void main(String args[]) {
        Scanner s = new Scanner(System.in);
        System.out.print("x? ");    int x = s.nextInt();
        System.out.print("y? ");    int y = s.nextInt();
        System.out.println(gcd(x, y));
    }
}

=======================
x? 162
y? 36
18
1
2
3
4
5
6
7
8
9
10
11
12
13
14
15
16
17
18
19
20
21
22
23
package blog.info;

public class FactorialSum {

  public static void main(String[] args) {
    calc(10);
  }

  public static void calc(int num) {
        int sum = 0;
        for(int i = 1; i <= num; i++){
            sum += Factorial1.factorial(i);	// 팩토리얼 함수 재사용
        }
        System.out.println(num + "의 팩토리얼: " + Factorial1.factorial(num) + "\n" + "누적 합계: " + sum);
  }

}

================================

10의 팩토리얼: 3628800
누적 합계: 4037913
1
2
3
4
5
6
7
8
9
10
11
12
13
14
15
16
17
18
19
20
21
22
23
24
25
26
27
28
29
30
31
32
33
34
35
36
37
38
39
40
41
42
43
44
45
46
47
48
49
50
51
52
53
54
55
56
57
58
59
60
61
62
63
64
public class QuickSort {

    // 배열의 i1번째 값과 i2번째 값을 교환.
    public static void arraySwap(int[] arrRef, int i1, int i2) {
        int temp1 = arrRef[i1];
        int temp2 = arrRef[i2];
        arrRef[i1] = temp2;
        arrRef[i2] = temp1;
    }

    public static void quickSort(int[] array, int left, int right) {

        // left: 왼쪽 인덱스, right: 오른쪽 인덱스
        // pivot: 축 값, 배열의 가장 왼쪽에 있는 데이터
        // i, j: 입력값 중 가장 왼쪽 축 값을 제외한 나머지 데이터들에 대해,
        //     가장 왼쪽부터 오른쪽으로 탐색할 인덱스 i와
        //     가장 오른쪽부터 왼쪽으로 탐색할 인덱스 j

        if(left >= right)    return;

        int pivot = array[left];
        int i = left + 1;
        int j = right;

        while(true) {
            while(pivot > array[i] && i < right) i++;
            while(pivot < array[j] && j > left) j--;
            if (i >= j)    break;
            arraySwap(array, i, j);    // 인덱스 j의 값이 인덱스 i보다 큰 경
        }

        arraySwap(array, j, left);

        // recursive calls
        quickSort(array, left, j-1);
        quickSort(array, j+1, right);

        // left, right는 계속 고정
    }

    public static void main(String[] args) {
        int[] array = {26, 14, 100, 95, 22, 17, 48, 20, 50, 90};

        System.out.print("Before: ");
        for(int i : array) {
            System.out.print(i + " ");
        }

        System.out.println();

        quickSort(array, 0, 9);

        System.out.print("After: ");
        for(int i : array) {
            System.out.print(i + " ");
        }
    }

}

===========================================

Before: 26 14 100 95 22 17 48 20 50 90
After: 14 17 20 22 26 48 50 90 95 100
퀵소트는 나중에 다시 글 올릴 예정..
1
2
3
4
5
6
7
8
9
10
11
12
13
14
15
16
17
18
19
20
21
22
23
24
25
26
27
28
29
30
31
32
33
34
35
36
37
38
39
40
41
42
43
44
45
46
47
48
49
50
51
52
53
54
55
56
57
58
59
60
61
62
63
package blog.info;

import java.io.File;
import java.io.IOException;
import java.util.ArrayList;
import java.util.List;

public class LittleFileWalker {

  StringBuilder sb = new StringBuilder();

  public String subDirList(String sourceDir) throws IOException{
    return subDirList(sourceDir, sourceDir);
  }

  private String subDirList(String sourceDir, String rootDir) throws IOException{
    File[] fileList = orderFileList(sourceDir);

    for(int i = 0 ; i < fileList.length ; i++){
      File file = fileList[i];
      String innerPath = file.getPath();
      if(file.isFile()){
        // 파일이 있다면 파일 이름 출력
        String tabs = "";
        sb.append(tabs + file.getName() + "\t" + file.length() + " B" );
        sb.append("\r\n");

      }else if(file.isDirectory()){
        sb.append("\r\n");
        sb.append("[" + innerPath.replace(rootDir, "") + "]");
        sb.append("\r\n");

        // 서브디렉토리가 존재하면 재귀적 방법으로 다시 탐색
        subDirList(file.getCanonicalPath().toString(), rootDir);
      }
    }
    return sb.toString();
  }

  private File[] orderFileList(String sourceDir) throws IOException{
    File dir = new File(sourceDir);
    List<File> newDir = new ArrayList<>();
    List<File> newFile = new ArrayList<>();
    for(int i = 0; i < dir.listFiles().length; i++) {
      if(dir.listFiles()[i].isDirectory()) {
        newDir.add(dir.listFiles()[i]);
      } else {
        newFile.add(dir.listFiles()[i]);
      }
    }
    // 파일 먼저 보여주고 디렉토리를 나중에 보여주면 순서가 꼬이지 않음
    List<File> unionList = new ArrayList<>(newFile);
    unionList.addAll(newDir);
    return unionList.toArray(new File[0]);
  }

  public static void main(String[] args) throws IOException {
    LittleFileWalker lfw = new LittleFileWalker();
    String output = lfw.subDirList("C:\\xampp");
    System.out.println(output);
  }
}
1
2
3
4
5
6
7
8
9
10
11
12
[\phpMyAdmin\libraries\classes\Plugins\Schema\Dia]
Dia.php	5964 B
DiaRelationSchema.php	7109 B
RelationStatsDia.php	7709 B
TableStatsDia.php	8024 B

[\phpMyAdmin\libraries\classes\Plugins\Schema\Eps]
Eps.php	7963 B
EpsRelationSchema.php	7465 B
RelationStatsEps.php	3449 B
TableStatsEps.php	4960 B
이건 폴더 내의 하위 폴더 및 파일 목록을 보여주는 프로그램인데, 이걸 반복문으로 구현해보겠다면?