JSP, Spring: 웹소켓(Web Socket) 1
JSP, Spring: 웹소켓(Web Socket) 1
웹소켓을 이용한 채팅 예제
코드
JSP 서블릿에서 작성
일반 JSP (서블릿)에서 사용하는 경우 다음 코드만 작성합니다.
1
2
3
4
5
6
7
8
9
10
11
12
13
14
15
16
17
18
19
20
21
22
23
24
25
26
27
28
29
30
31
32
33
34
35
36
37
38
39
40
41
42
43
44
45
46
47
48
49
50
51
52
53
package com.example.thymeleaf.websocket;

import java.io.IOException;
import java.util.ArrayList;
import java.util.Collections;
import java.util.List;

import javax.websocket.OnClose;
import javax.websocket.OnMessage;
import javax.websocket.OnOpen;
import javax.websocket.Session;
import javax.websocket.server.ServerEndpoint;

@ServerEndpoint("/ws")    // 웹소켓용 서버 주소 지정 (ws://[서버 주소]/ws)
public class WebSocket {

    //유저 집합 리스트
    static List<Session> sessionUsers = Collections.synchronizedList(new ArrayList<>());

    /**
     * 웹 소켓이 접속되면 유저리스트에 세션을 넣는다.
     * @param userSession 웹 소켓 세션
     */
    @OnOpen
    public void handleOpen(Session userSession){
        sessionUsers.add(userSession);
    }
    /**
     * 웹 소켓으로부터 메시지가 오면 호출한다.
     * @param message 메시지
     * @param userSession
     * @throws IOException
     */
    @OnMessage
    public void handleMessage(String message, Session userSession) throws IOException{

        for(Session ss : sessionUsers) {
            if(ss != userSession) {
                ss.getBasicRemote().sendText(message);
            }
        }
    }

    /**
     * 웹소켓을 닫으면 해당 유저를 유저리스트에서 뺀다.
     * @param userSession
     */
    @OnClose
    public void handleClose(Session userSession){
        sessionUsers.remove(userSession);
    }

}
스프링부트를 사용하는 경우
스프링 부트를 사용하는 경우 다음 코드를 추가로 작성한다. (중요)
1
2
3
4
5
6
7
8
9
10
11
12
13
14
15
16
17
18
19
20
package com.example.thymeleaf.websocket;

import org.springframework.context.annotation.Bean;
import org.springframework.context.annotation.Configuration;
import org.springframework.web.socket.server.standard.ServerEndpointExporter;

@Configuration
public class EndpointConfig
{
    @Bean // 웹소켓 클래스의 이름에 맞춰 작성
    public WebSocket webSocket(){
        return new WebSocket();
    }

    @Bean
    public ServerEndpointExporter endpointExporter(){
        return new ServerEndpointExporter();
    }

}
HTML 코드
1
2
3
4
5
6
7
8
9
10
11
12
<body>
    <div id=wrapper >
        <div id=chatArea></div>
        <div id=chatInput >
          <div>
          	<input type=text id="inputMessage" class="form-control"
                  placeholder="채팅을 입력하세요.">
                  <button id=send class="btn btn-default">send</button>
          </div>
        </div>
    </div>
</body>
자바스크립트(JQuery 포함)
1
2
3
4
5
6
7
8
9
10
11
12
13
14
15
16
17
18
19
20
21
22
23
24
25
26
27
28
29
30
31
32
33
34
35
36
37
38
39
40
   var webSocket = new WebSocket('ws://[서버의 절대 주소]/ws');
   webSocket.onerror = onError
   webSocket.onopen = onOpen
   webSocket.onmessage = onMessage

   function onMessage(event) {
   	var $div = $('<div/>', {"class": "msg msg-other", text: "상대: " + event.data })
       $("#chatArea").append($div);
   }
   function onOpen(event) {
   	var $div = $('<div/>', {"class": "msg msg-connect", text: "연결성공"})
       $("#chatArea").append($div);
   }
   function onError(event) {
   	var $div = $('<div/>', {"class": "msg msg-error", text: "연결이 끊겼습니다."})
       $("#chatArea").append($div);
   }

   function send() {
       if (!inputMessage.value) {
           alert("채팅을 입력하세요.");
           return;
       }
       webSocket.send(inputMessage.value);
       var $div = $('<div/>', {"class": "msg msg-me", text: "나: " + inputMessage.value })
       $("#chatArea").append($div);

       $("#inputMessage").val("");
       $("#inputMessage").focus();
   }

   $("#inputMessage").keypress(function(e) {
       if (e.which == 13) {
           send();
       }
   });

   $("#send").click(function() {
       send();
   })
[서버의 절대 주소]에는 외부에서 자신의 서버에 접속할 수 있는 절대 주소를 입력합니다. localhost, 127.0.0.1 이런 주소가 아니라 ISP에 할당된 주소를 입력해야 합니다.
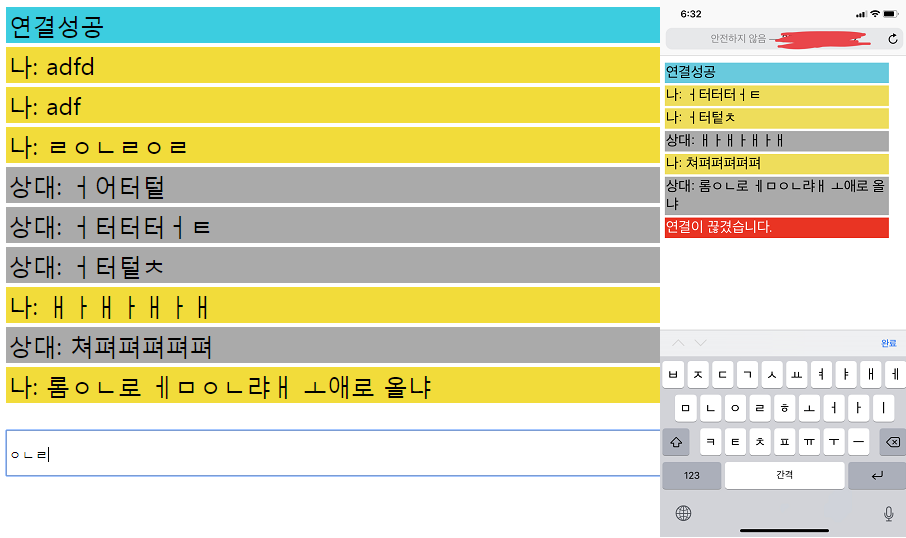
실행 화면
This post is licensed under
CC BY 4.0
by the author.