JSP, Spring: 웹소켓(Web Socket) 2 + 예제: 긴급상황 경보 표시가 나오는 지도
이전 글: JSP, Spring: 웹소켓(Web Socket) 1 참조
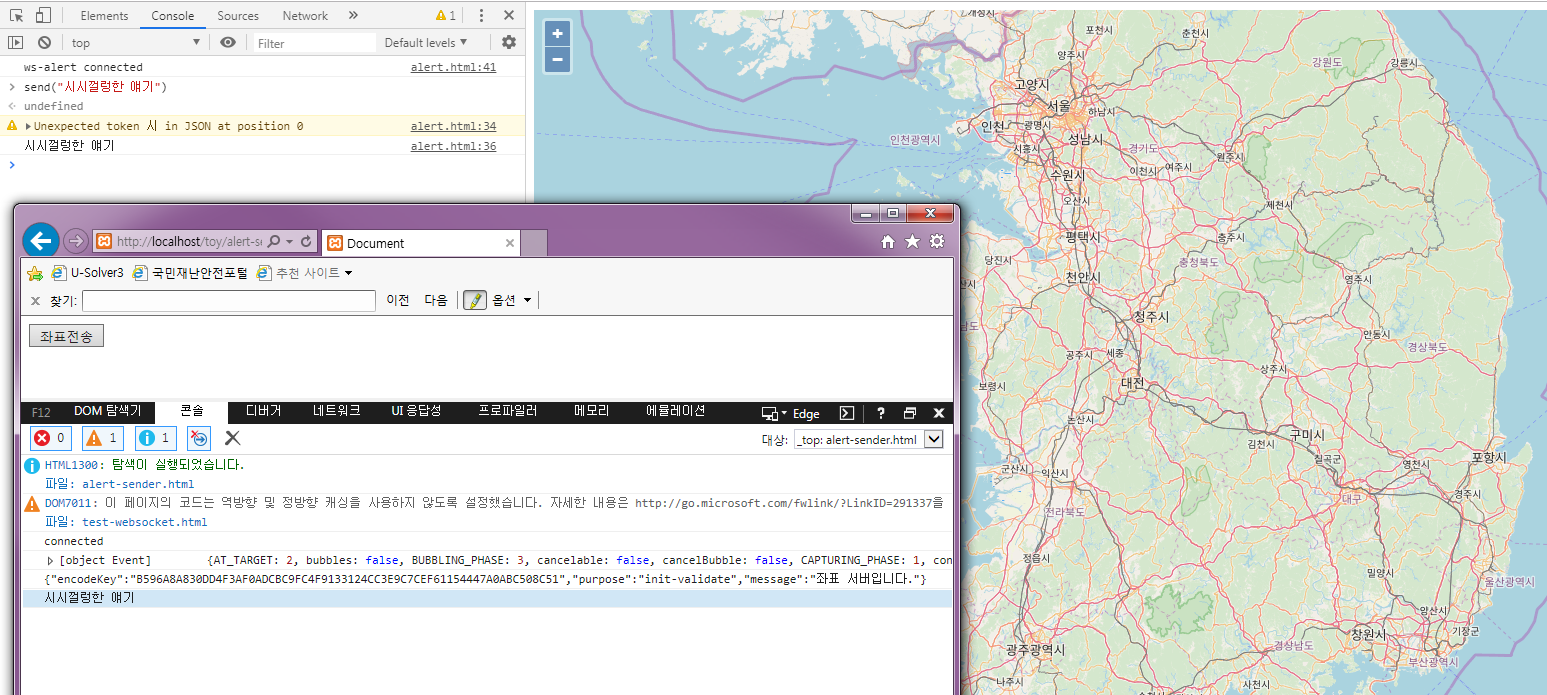
클라이언트 측에서는 계속 대기하고 있다가 서버에서 긴급 상황(?)이 일어났다는 신호와 지도 좌표를 보내면 즉시 해당 좌표에 경고 상황이 일어났다고 표시하는 웹 페이지를 만들어볼 것이다. 실제 시스템이 어떻게 동작하는지는 모르겠고 뇌내망상으로 진행함.
브라우저에 지도를 표시하는 방법과 좌표에 플래시 효과를 주는 예제는 다음 페이지를 참조: OpenLayers 4: Custom Animation
1. 이전 웹소켓 클래스를 참조해 새로운 웹소캣 클래스를 작성한다.
1
2
3
4
5
6
7
8
9
10
11
12
13
14
15
16
17
18
19
20
21
22
23
24
25
26
27
28
29
30
31
32
33
34
35
36
37
38
39
40
41
42
43
44
45
46
47
48
49
50
51
52
53
54
55
56
57
58
59
60
61
62
63
64
65
66
67
68
69
70
71
72
73
74
75
76
77
78
79
80
81
82
83
84
85
86
87
88
89
90
package com.example.thymeleaf.websocket;

import java.io.IOException;
import java.util.ArrayList;
import java.util.Collections;
import java.util.List;
import java.util.Map;

import javax.websocket.OnClose;
import javax.websocket.OnMessage;
import javax.websocket.OnOpen;
import javax.websocket.Session;
import javax.websocket.server.ServerEndpoint;

import org.springframework.boot.json.BasicJsonParser;
import org.springframework.boot.json.JsonParser;


@ServerEndpoint("/ws-alert")    // 웹소켓용 서버 주소 지정 (ws://[서버 주소]/ws)
public class AlertWebSocket {

  static final String ENCODED_KEY = "B596A8A830DD4F3AF0ADCBC9FC4F9133124CC3E9C7CEF61154447A0ABC508C51";
  private Session server;

    //유저 집합 리스트
    static List<Session> sessionUsers = Collections.synchronizedList(new ArrayList<>());

    /**
     * 웹 소켓이 접속되면 유저리스트에 세션을 넣는다.
     * @param userSession 웹 소켓 세션
     */
    @OnOpen
    public void handleOpen(Session userSession){
    	System.out.println("session: " + userSession.getId());
        sessionUsers.add(userSession);
    }
    /**
     * 웹 소켓으로부터 메시지가 오면 호출한다.
     * @param message 메시지
     * @param userSession
     * @throws IOException
     */
    @OnMessage
    public void handleMessage(String message, Session userSession) throws IOException{

    	Map<?, ?> out = null;

    	try {
    		JsonParser jp = new BasicJsonParser();
        	out = jp.parseMap(message);
        } catch(Exception e) {
        	System.err.println(e);
        }

    	if(out != null) {
    		if(out.get("encodeKey").equals(ENCODED_KEY)
                    && out.get("purpose").equals("init-validate")) {
    			System.out.println("== 이 사람은 좌표 서버입니다. ==");
        		server = userSession;
    		} else if (out.get("encodeKey").equals(ENCODED_KEY)
                    && out.get("purpose").equals("send-coords")) {
    			ArrayList<?> coords = (ArrayList<?>) out.get("coords");
    			sendMessageToAll(coords.toString(), sessionUsers);
    		}

    	} else {
    		sendMessageToAll(message, sessionUsers);
    	}

        System.out.println(userSession.getId() + ": " + message);


    }

    /**
     * 웹소켓을 닫으면 해당 유저를 유저리스트에서 뺀다.
     * @param userSession
     */
    @OnClose
    public void handleClose(Session userSession){
        sessionUsers.remove(userSession);
    }

    public void sendMessageToAll(String message, List<Session> sessionUsers) throws IOException {
    	for(Session ss : sessionUsers) {
      ss.getBasicRemote().sendText(message);
      }
    }

}
아직 접속시 정보를 보내는 법을 몰라 handleMessage()에 간단한 인증 과정을 넣었다. 좌표 담당 클라이언트가 접속을 시작하면 인증 요청과 인증 코드를 보낼 것이다.
스프링 부트 시 다음 부분을 추가 작성한다.
1
@Bean public AlertWebSocket alertWebSocket() { return new AlertWebSocket(); }
1
2
3
4
5
6
7
8
9
10
11
12
13
14
15
16
17
18
19
20
21
22
23
24
25
package com.example.thymeleaf.websocket;

import org.springframework.context.annotation.Bean;
import org.springframework.context.annotation.Configuration;
import org.springframework.web.socket.server.standard.ServerEndpointExporter;

@Configuration
public class EndpointConfig
{
    @Bean
    public WebSocket webSocket(){
        return new WebSocket();
    }

    @Bean
    public AlertWebSocket alertWebSocket() {
    	return new AlertWebSocket();
    }

    @Bean
    public ServerEndpointExporter endpointExporter(){
        return new ServerEndpointExporter();
    }

}
2. 좌표 담당 클라이언트 측의 웹 페이지 작성
1
2
3
4
5
6
7
8
9
10
11
12
13
14
15
16
17
18
19
20
21
22
23
24
25
26
27
28
29
30
31
32
33
34
35
36
37
38
39
40
41
42
//<button onclick="sendCoords()">좌표전송</button>

   var webSocket = new WebSocket('ws://서버주소/ws-alert');
   webSocket.onerror = onError
   webSocket.onopen = onOpen
   webSocket.onmessage = onMessage

   var object = {
     encodeKey: "B596A8A830DD4F3AF0ADCBC9FC4F9133124CC3E9C7CEF61154447A0ABC508C51",
     purpose: "init-validate",
     message: "좌표 서버입니다."
   }

   function onMessage(event) {
     console.log(event.data)
   }

   function onOpen(event) {
     console.log('connected')
     console.log(event)

     console.log(JSON.stringify(object))

     webSocket.send(JSON.stringify(object));
   }

   function onError(event) {}

   function send() {
     webSocket.send("dfnadksfnk")
   }

   function sendCoords() {
     var coords = []
     coords.push([126.97, 37.57])
     coords.push([129.07, 35.18])
     coords.push([127.38, 36.35])

     object.purpose = "send-coords"
     object.coords = coords
     webSocket.send(JSON.stringify(object))
   }
onOpen() 실행 시 한 번 인증 코드를 보내면 웹소켓 서버에서 인증되면 이 사람(좌표 담당) 전용의 작업들을 실행할 것이다.
3. 나머지 클라이언트 측 웹 페이지 작성
1
2
3
4
5
6
7
8
9
10
11
12
13
14
15
16
17
18
19
20
<!DOCTYPE html>
<html>

<head>
  <title>Custom Animation</title>
  <link rel="stylesheet" href="https://openlayers.org/en/v4.6.5/css/ol.css" type="text/css">
  <!-- The line below is only needed for old environments like Internet Explorer and Android 4.x -->
  <script src="https://cdn.polyfill.io/v2/polyfill.min.js?features=requestAnimationFrame,Element.prototype.classList,URL"></script>
  <script src="https://openlayers.org/en/v4.6.5/build/ol.js"></script>
</head>

<body>
  <div id="map" class="map"></div>
  <script>
     //
  </script>
</body>

</html>
1
2
3
4
5
6
7
8
9
10
11
12
13
14
15
16
17
18
19
20
21
22
23
24
25
26
27
28
29
30
31
32
33
34
35
36
37
38
39
40
41
42
43
44
45
46
47
48
49
50
51
52
53
54
55
56
57
58
59
60
61
62
63
64
65
66
67
68
69
70
71
72
73
74
75
76
77
78
79
80
81
82
83
84
85
86
87
88
89
90
91
92
93
94
95
96
97
98
99
100
101
102
103
104
105
106
107
108
109
110
111
112
113
114
115
116
117
118
119
// radius will be START_RAD at start and END_RAD at end.
var START_RAD = 5
var END_RAD = 100

var webSocket = new WebSocket('ws://서버주소/ws-alert');
webSocket.onerror = onError
webSocket.onopen = onOpen
webSocket.onmessage = onMessage

function onMessage(event) {
  try {
    var coords = JSON.parse(event.data)

    for (var i in coords) {
      addFlickeringFeature(coords[i])
    }

  } catch (e) {
    console.warn(e.message)
  }
  console.log(event.data)

}

function onOpen(event) {
  console.log('ws-alert connected')
}

function onError(event) {

}

function send(msg) {
  webSocket.send(msg)
}

var map = new ol.Map({
  layers: [
    new ol.layer.Tile({
      source: new ol.source.OSM({
        wrapX: false
      })
    })
  ],
  controls: ol.control.defaults({
    attributionOptions: {
      collapsible: false
    }
  }),
  target: 'map',
  view: new ol.View({
    center: [14235526.306672268, 4366292.816742867],
    zoom: 8
  })
});

var source = new ol.source.Vector({
  wrapX: false
});
var vector = new ol.layer.Vector({
  source: source
});
map.addLayer(vector);

function addFeature(coord) {
  var geom = new ol.geom.Point(ol.proj.transform(coord,
    'EPSG:4326', 'EPSG:3857'));
  var feature = new ol.Feature(geom);
  source.addFeature(feature);
}

function addFlickeringFeature(coord) {
  window.setInterval(function() {
    addFeature(coord)
  }, 200);
}

var duration = 3000;

function flash(feature) {
  var start = new Date().getTime();
  var listenerKey;

  function animate(event) {
    var vectorContext = event.vectorContext;
    var frameState = event.frameState;
    var flashGeom = feature.getGeometry().clone();
    var elapsed = frameState.time - start;
    var elapsedRatio = elapsed / duration;

    var radius = ol.easing.easeOut(elapsedRatio) * (END_RAD - START_RAD) + START_RAD;
    var opacity = ol.easing.easeOut(1 - elapsedRatio);

    var style = new ol.style.Style({
      image: new ol.style.Circle({
        radius: radius,
        snapToPixel: false,
        stroke: new ol.style.Stroke({
          color: 'rgba(255, 0, 0, ' + opacity + ')',
          width: 0.25 + opacity
        })
      })
    });

    vectorContext.setStyle(style);
    vectorContext.drawGeometry(flashGeom);
    if (elapsed > duration) {
      ol.Observable.unByKey(listenerKey);
      return;
    }
    // tell OpenLayers to continue postcompose animation
    map.render();
  }
  listenerKey = map.on('postcompose', animate);
}

source.on('addfeature', function(e) {
  flash(e.feature);
});
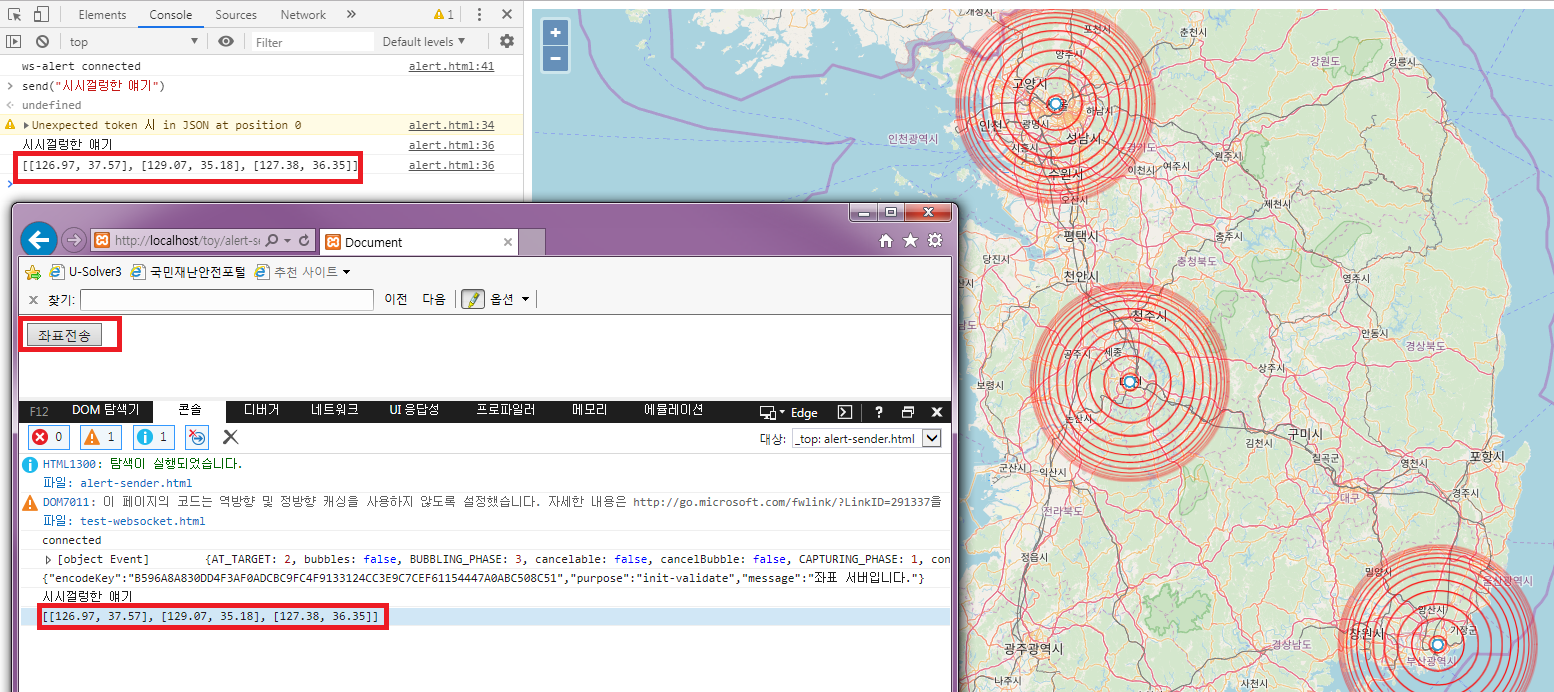
지도 예제를 참조해서 만들며 좌표 담당이 아닌 다른 사람들이 메시지를 보내면 가만히 있다가 좌표 담당이 긴급 상황 신호와 좌표를 보내면 그 좌표를 바탕으로 빨간색 원을 확대하면서 깜빡거린다.
This post is licensed under
CC BY 4.0
by the author.