Swift(스위프트): 달력 그리기 (1) → 달력 데이터 분석
출처
다음 글
다음 글 » Swift(스위프트): 달력 그리기 (2) → Interface Builder 스토리보드 GUI 방식으로 그리기
소개
아래와 같은 달력을 그리고자 합니다.
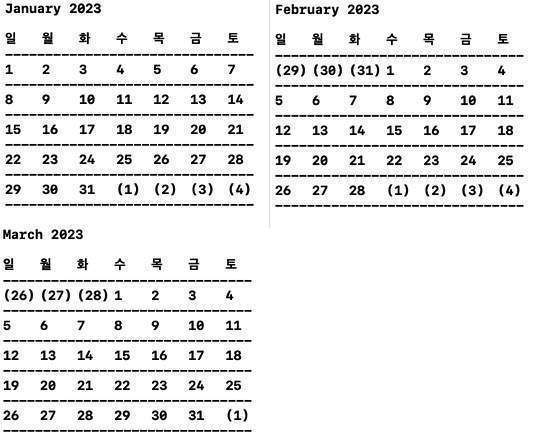
달력을 보면 일요일 ~ 토요일 순으로 해당 날짜가 적혀 있습니다. 괄호 안은 해당 달에 속하지 않는 이전 달 또는 다음달 날짜가 적혀있습니다. 예를 들어 2023년 2월(February)을 보면 첫 주의 (29) (30) (31)은 1월에 속해있으며 마지막 주의 (1) (2) (3) (4)는 3월에 속해 있습니다. (각 월간 달력과 비교해보세요.)
이러한 달력을 그릴 수 있는 방법에 대해 소개해드리겠습니다. 이번 포스트는 달력에 대한 Metadata를 분석하고 생성하는 방법에 관한 내용을 다루겠습니다.
Xcode에서 새로운 플레이그라운드에서 새로운 파일을 생성합니다.
달력 데이터 분석
사전 준비
Day 구조체
한 달을 표시하려면 일(days) 목록이 필요합니다. Day 구조체를 추가합니다.
1
2
3
4
5
6
7
8
9
10
11
12
13
14
15
struct Day {
    /// Date 인스턴스.
    let date: Date

    /// 화면에 표시될 숫자.
    /// 예) Date 인스턴스가 2022년 1월 25일이라면 -> 25
    let number: String

    /// 이 날짜가 선택되었는지 여부.
    let isSelected: Bool

    /// 이 날짜가 현재 달 내에 있는지 추적.
    /// 예) 1월 달력을 그리고자 할 떄 Date 인스턴스가 1월 25일이라면 true, 2월 1일이라면 false
    let isWithinDisplayedMonth: Bool
}
Day구조체는 특정 일에 대한 각종 정보를 나타냅니다.- 어느 특정 월에 대한 데이터가
[Days]형태로 관리됩니다.
MonthMetadata 구조체
그 밑에 MonthMetadata 구조체를 추가합니다.
1
2
3
4
5
6
7
8
9
10
11
struct MonthMetadata {
    /// 해당 달의 총 일수, 예를 들어 1월은 31일까지 있으므로 31
    let numberOfDays: Int

    /// 해당 달의 첫 Date
    let firstDay: Date

    /// 해당 달의 첫 Date가 무슨 요일인지 반환, 일 ~ 토 => 1 ~ 7
    /// 예) 수요일이라면 4
    let firstDayWeekday: Int
}
- 이 구조체는 기준 데이트(Base Date; 보통 현재 시각에 대한 Date 인스턴스를 기준 데이트로 합니다.)를 토대로 월별 메타데이터를 생성하는데 사용됩니다..
CalendarDataError
그 밑에 CalendarDataError를 추가합니다. 메타데이터 생성에 실패했을 때 발생하는 에러로, 나중에 사용될 것입니다.
1
2
3
enum CalendarDataError: Error {
    case metadataGeneration
}
날짜 관련 변수 추가
달력 생성에 사용할 날짜 관련 변수를 추가합니다.
1
2
3
4
5
6
7
8
9
10
11
12
13
14
15
16
17
18
19
private let baseDate = Date()

private let calendar = Calendar(identifier: .gregorian)

private let selectedDate: Date = baseDate

private var dateFormatter_OnlyD: DateFormatter = {
    let dateFormatter = DateFormatter()
    dateFormatter.dateFormat = "d"
    return dateFormatter
}()

private var dateFormatter_CalendarTitle: DateFormatter = {
    let dateFormatter = DateFormatter()
    dateFormatter.calendar = Calendar(identifier: .gregorian)
    dateFormatter.locale = Locale.autoupdatingCurrent
    dateFormatter.setLocalizedDateFormatFromTemplate("MMMM y")
    return dateFormatter
}()
- baseDate
- 달력을 생성하는 기준 날짜입니다. 예를 들어
baseDate가 2023년 2월 3일이라면 2023년 2월 달력을 생성하게 됩니다. - 현재 날짜
Date()를 기준으로 하겠습니다.
- 달력을 생성하는 기준 날짜입니다. 예를 들어
- calendar
baseDate를 기준으로 한달 전, 한달 후 등 날짜를 계산할 때 사용할Calendar인스턴스입니다.
- selectedDate는 날짜를 선택했을 때 해당 날짜를 저장하는 변수로, 다음 포스트에서 다룰 것입니다
- .dateFormatter
- 날짜를
String포맷으로 반환합니다. - 첫번째는 요일 숫자만 반환하고, 두번째는
"January 2023"형태의 달력 제목에 사용할 포맷을 반환합니다.
- 날짜를
메타데이터 생성
다음 함수들을 이용해 메타데이터를 생성할 것입니다.
1
2
3
4
5
6
7
8
9
10
11
12
13
14
15
16
///  1. Date를 기준으로 월별 메타데이터인 MonthMetaData 인스턴스를 생성.
func monthMetadata(for baseDate: Date) throws -> MonthMetadata {
}

/// 2. Adds or subtracts an offset from a Date to produce a new one, and return its result.
func generateDay(offsetBy dayOffset: Int, for baseDate: Date, isWithinDisplayedMonth: Bool) -> Day {
}

/// 3. Takes the first day of the displayed month and returns an array of Day objects.
func generateStartOfNextMonth(using firstDayOfDisplayedMonth: Date) -> [Day] {
}

/// 4. Takes in a Date and returns an array of Days.
func generateDaysInMonth(for baseDate: Date) -> [Day] {
}
- 현재
baseDate를 기준으로MonthMetadata를 생성합니다. Date에서 오프셋을 더하거나 빼서 산출한 새로운Day를 생성하고 반환합니다.- 표시된 월의 첫 번째 날(
firstDayOfDisplayedMonth)을 바탕으로 Day 객체의 배열을 반환합니다. 이 함수를 통해 매월 마지막 주를 어떻게 처리할 것인지를 정의할 수 있습니다. - 현재
baseDate를 기준으로 달력 표시에 사용될[Days]배열을 반환합니다.
이 중 1 ~ 3번은 내부 계산에 사용되며, 실제로 사용하는 함수는 마지막 generateDaysInMonth(...) 함수입니다.
월별 메타데이터 생성
현재 baseDate를 기준으로 MonthMetadata를 생성합니다. monthMetadata(...) 함수를 추가합니다.
1
2
3
4
5
6
7
8
9
10
11
12
13
14
15
16
17
18
19
20
21
///  Date를 기준으로 월별 메타데이터인 MonthMetaData 인스턴스를 생성.
func monthMetadata(for baseDate: Date) throws -> MonthMetadata {
    // You ask the calendar for the number of days in baseDate‘s month, then you get the first day of that month.
    guard
        let numberOfDaysInMonth = calendar.range(of: .day, in: .month, for: baseDate)?.count,
        let firstDayOfMonth = calendar.date(from: calendar.dateComponents([.year, .month], from: baseDate))
    else {
        // Both of the previous calls return optional values. If either returns nil, the code throws an error and returns.
        throw CalendarDataError.metadataGeneration
    }

    // You get the weekday value, a number between one and seven that represents which day of the week the first day of the month falls on.
    // weekday: 주일, 평일: 일요일 이외의 6일간을 가리키는 경우와 토·일요일 이외의 5일간을 가리키는 경우가 있음.
    let firstDayWeekday: Int = calendar.component(.weekday, from: firstDayOfMonth)

    // Finally, you use these values to create an instance of MonthMetadata and return it.
    return MonthMetadata(
        numberOfDays: numberOfDaysInMonth,
        firstDay: firstDayOfMonth,
        firstDayWeekday: firstDayWeekday)
}
- guard ~ else
numberOfDaysInMonth:baseDate를 기반으로 달력의 월의 일수firstDayOfMonth: 해당 월의 첫 번째 날을 얻습니다.- 둘 중 하나라도
nil을 반환하면 코드에서CalendarDataError.metadataGeneration오류가 발생하고 반환됩니다.
- 월의 첫 번째 날이 해당하는 요일(일요일 ~ 토요일)을 나타내는
1에서7사이의 숫자인 값을 얻습니다. - 이러한 값들을 사용하여
MonthMetadata의 인스턴스를 생성하고 반환합니다.
해당 달의 [Days] 목록 생성
이제 가장 중요한 Day 목록을 생성하는 단계입니다.
generateDay 추가
먼저 generateDay 함수를 추가합니다.
1
2
3
4
5
6
7
8
9
10
/// Adds or subtracts an offset from a Date to produce a new one, and return its result.
func generateDay(offsetBy dayOffset: Int, for baseDate: Date, isWithinDisplayedMonth: Bool) -> Day {
    let date = calendar.date(byAdding: .day, value: dayOffset, to: baseDate) ?? baseDate

    return Day(
        date: date,
        number: dateFormatter_OnlyD.string(from: date),
        isSelected: calendar.isDate(date, inSameDayAs: selectedDate),
        isWithinDisplayedMonth: isWithinDisplayedMonth)
}
Date에서 오프셋을 더하거나 빼서 산출한 새로운Day를 생성하고 반환합니다.- date
- 예를 들어 현재 날짜
baseDate가 2월 3일이라면,offset이-1인 경우 2월 2일,+1인 경우 2월 3일을 반환합니다.
- 예를 들어 현재 날짜
- return Day(…)
number:Date의 일 숫자isSelected:selectedDate와 같은 날짜인지 여부isWithinDisplayedMonth: 예를 들어 2월의 달력을 그린다고 하면, 첫번째 섹션의 2월 달력 그림에서 괄호 안에 있는 29 ~ 31일은 1월달의 Date 인스턴스이므로false가 됩니다.
generateStartOfNextMonth 추가
다음 generateStartOfNextMonth 함수를 추가합니다.
1
2
3
4
5
6
7
8
9
10
11
12
13
14
15
16
17
18
19
20
21
22
23
24
25
26
27
28
29
/// Takes the first day of the displayed month and returns an array of Day objects.
func generateStartOfNextMonth(using firstDayOfDisplayedMonth: Date) -> [Day] {
    // Retrieve the last day of the displayed month. If this fails, you return an empty array.
    guard let lastDayInMonth = calendar.date(
        byAdding: DateComponents(month: 1, day: -1),
        to: firstDayOfDisplayedMonth) else {
        return []
    }

    // Calculate the number of extra days you need to fill the last row of the calendar.
    // For instance, if the last day of the month is a Saturday, the result is zero and you return an empty array.
    let additionalDays = 7 - calendar.component(.weekday, from: lastDayInMonth)
    guard additionalDays > 0 else {
        return []
    }

    /*
     Create a Range<Int> from one to the value of additionalDays, as in the previous section.
     Then, it transforms this into an array of Days.
     This time, generateDay(offsetBy:for:isWithinDisplayedMonth:) adds the current day in the loop to lastDayInMonth
     to generate the days at the beginning of the next month.
     */
    let days: [Day] = (1...additionalDays)
        .map {
            generateDay(offsetBy: $0, for: lastDayInMonth, isWithinDisplayedMonth: false)
        }

    return days
}
- 이 함수를 통해 매월 마지막 주를 어떻게 처리할 것인지를 정의합니다.
- guard let lastDayInMonth = …
firstDayOfDisplayedMonth의 마지막 날을 찾습니다. 예를 들어 1월이라면 1월 31일의 Date 인스턴스입니다.- 실패하면 빈 배열을 반환합니다.
- additionalDays
- 달력의 마지막 행을 채우는 데 필요한 추가 일수를 계산합니다.
- 예를 들어 월의 마지막 날이 토요일인 경우 결과는
0이고 빈 배열을 반환합니다. - 월의 마지막 날이 화요일인 경우 결과는
4(수, 목, 금, 토)이며 해당하는 배열을 반환합니다.
- days
1에서additionalDays값까지Range<Int>를 만듭니다.- 그런 다음 이를
Days의 배열로 변환합니다. - 앞에서 추가한 g
enerateDay(offsetBy:for:isWithinDisplayedMonth:)가 루프의 현재 날짜를lastDayInMonth에 추가하여 다음 달 시작 날짜를 생성합니다.
- 이 방법의 결과는
generateDaysInMonth(for:)에서 생성한Days배열과 결합하여 사용됩니다.
monthMetadata(for:) 추가
다음 실제로 사용할 함수인 monthMetadata(for:) 를 추가합니다.
1
2
3
4
5
6
7
8
9
10
11
12
13
14
15
16
17
18
19
20
21
22
23
24
25
26
27
28
29
30
31
32
33
34
/// Takes in a Date and returns an array of Days.
func generateDaysInMonth(for baseDate: Date) -> [Day] {
    // Retrieve the metadata you need about the month, using monthMetadata(for:).
    // If something goes wrong here, the app can’t function. As a result, it terminates with a fatalError.
    guard let metadata = try? monthMetadata(for: baseDate) else {
        fatalError("An error occurred when generating the metadata for \(baseDate)")
    }

    let numberOfDaysInMonth = metadata.numberOfDays
    let offsetInInitialRow = metadata.firstDayWeekday
    let firstDayOfMonth = metadata.firstDay

    /*
     If a month starts on a day other than Sunday, you add the last few days from the previous month at the beginning.
     This avoids gaps in a month’s first row. Here, you create a Range<Int> that handles this scenario.
     For example, if a month starts on Friday, offsetInInitialRow would add five extra days to even up the row.
     You then transform this range into [Day], using map(_:).
     */
    var days: [Day] = (1..<(numberOfDaysInMonth + offsetInInitialRow))
        .map { day in
            // Check if the current day in the loop is within the current month or part of the previous month.
            let isWithinDisplayedMonth = day >= offsetInInitialRow

            // Calculate the offset that day is from the first day of the month. If day is in the previous month, this value will be negative.
            let dayOffset = isWithinDisplayedMonth ? day - offsetInInitialRow : -(offsetInInitialRow - day)

            // Call generateDay(offsetBy:for:isWithinDisplayedMonth:), which adds or subtracts an offset from a Date to produce a new one, and return its result.
            return generateDay(offsetBy: dayOffset, for: firstDayOfMonth, isWithinDisplayedMonth: isWithinDisplayedMonth)
        }

    days += generateStartOfNextMonth(using: firstDayOfMonth)

    return days
}
- guard let metadata = …
monthMetadata(for:)를 사용하여 해당 월에 대해 필요한 메타데이터를 검색합니다. 여기서 문제가 발생하면 앱이 작동하지 않습니다. 그 결과,fatalError로 종료됩니다.
- days
- 한 달이 일요일이 아닌 다른 날에 시작하는 경우 이전 달의 마지막 며칠을 시작 부분에 추가합니다.
- 이렇게 하면 한 달의 첫 번째 행에 공백이 생기는 것을 방지할 수 있습니다.
- 여기에서 이 시나리오를 처리하는
Range<Int>를 만듭니다. - 예를 들어 한 달이 금요일에 시작하는 경우
offsetInInitialRow는5일을 더 추가하여 해당 라인을 고르게 만듭니다. (밑의 다이어그램 참조) map(_:)을 사용하여 이 범위를[Day]로 변환합니다.
- 루프의 현재 날짜가 현재 달 또는 이전 달의 일부인지 확인합니다.
- 해당 날짜가 해당 월의 1일부터 얼마나 떨어져 있는지 오프셋을 계산합니다. 일이 이전 달인 경우 이 값은 음수가 됩니다.
- 마지막 주에 해당하는 새로운 날짜를 생성하기 위해 날짜에서 오프셋을 더하거나 빼는
generateDay(offsetBy:for:isWithinDisplayedMonth:)를 호출하고 그 결과를 반환합니다.
아래는 이해를 돕기 위한 다이어그램입니다.
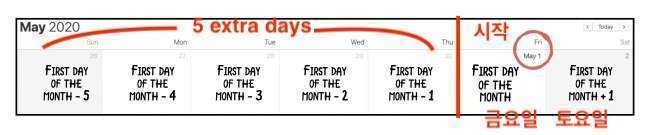
2020년 5월 첫째주 4월 26일부터 5월 2일까지
달력을 그리기 위한 데이터 생성 부분이 완성되었습니다.
달력 그리기
이를 바탕으로 콘솔에 print하는 방식으로 임시로 달력을 그려보겠습니다.
1
2
3
4
5
6
7
8
9
10
11
12
13
14
15
16
17
18
19
20
21
22
23
24
25
26
27
28
29
30
31
32
33
let targetMonths = [
    calendar.date(byAdding: .month, value: -1, to: baseDate),
    baseDate,
    calendar.date(byAdding: .month, value: +1, to: baseDate),
]

for month in targetMonths {
    guard let baseDate = month else { fatalError() }

    let days = generateDaysInMonth(for: baseDate)

    let lineText = "-------------------------------"


    // 제목
    print("\(dateFormatter_CalendarTitle.string(from: baseDate))")
    print()

    // 요일
    let weekdayText = ["일", "월", "화", "수", "목", "금", "토"]
    print(weekdayText.joined(separator: "\t"))
    print(lineText)

    // 숫자
    for (index, day) in days.enumerated() {
        print(day.isWithinDisplayedMonth ? day.number : "(\(day.number))", terminator: "\t")
        if (index + 1) % 7 == 0 {
            print("\n\(lineText)")
        }
    }

    print("\n\n")
}
- targetMonths
baseDate를 바탕으로 그 이전달 및 다음달을 타깃으로 합니다. 현재2월인 경우1월, 2월, 3월이 대상입니다.
- days = generateDaysInMonth(for: baseDate)
- 현재
baseDate를 기준으로 달력에 표시할 Day 목록을 생성합니다.
- 현재
- \t
String에서 사용하며, 일정 너비의 공간(탭)을 추가합니다.
- day.isWithinDisplayedMonth ? … : …
- 예를 들어 2월 달력을 그리는 경우 2월에 해당하면 그대로
day.number를 표시하고, 그 외의 경우는 이전 달 또는 다음 달의 일수이므로 괄호를 쳐서day.number를 표시합니다.
- 예를 들어 2월 달력을 그리는 경우 2월에 해당하면 그대로
- if (index + 1) % 7 == 0
- 한 라인 당 일요일 ~ 토요일 총 7개의 칸이 표시되어야 합니다.
- 7개 숫자를 표시하였다면, 새로운 라인으로 이동합니다.
다음 포스트는 위의 내용을 기반으로 스토리보드의 UICollectionView에서 달력을 표시하는 방법에 대해 알아보겠습니다.
전체 코드