Swift(스위프트): 튜토리얼을 통한 디자인 패턴: MVVM (Model-View-ViewModel) 1
원문
버전
- Swift 4
- iOS 11
- Xcode 9
튜토리얼을 통한 디자인 패턴: MVVM (Model-View-ViewModel) 上
MVVM(Model-View-ViewModel)은 오브젝트를 세 개의 개별 그룹으로 분리하는 구조적인 디자인 패턴입니다.
- 모델(
Model)은 애플리케이션 데이터를 보유합니다. 일반적으로 구조체(struct) 또는 간단한 클래스(class)입니다. - 뷰(
View)는 화면에 시각적 요소와 컨트롤을 표시합니다. 일반적으로UIView의 서브클래스입니다. - 뷰 모델(
View models)은 모델 정보를 뷰에 표시할 수 있는 값으로 변환합니다. 일반적으로 클래스이므로 참조로 전달할 수 있습니다.
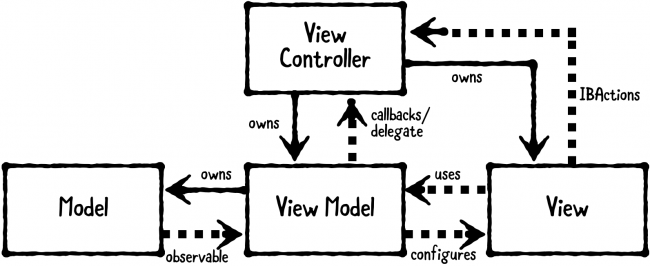
이 패턴이 친숙한가요? Model-View-Controller(MVC)와 매우 유사합니다. 이 페이지 상단의 클래스 다이어그램에는 뷰 컨트롤러가 포함되어 있습니다. 뷰 컨트롤러는 MVVM에 존재하지만 그 역할은 최소화됩니다.
언제 사용해야 합니까?
뷰에 정보를 표시할 때 모델에 있는 정보를 다른 표현 방식으로 변환해야 할 때 이 패턴을 사용하십시오. 예를 들어 보기 모델을 사용하여 날짜를 날짜 형식의 String으로, Decimal(10진수)를 통화 형식의 String로 변환하거나 기타 여러 유용한 변환 방법을 사용할 수 있습니다.
이 패턴은 MVC를 특히 잘 보완합니다. 뷰 모델이 없다면 뷰 컨트롤러(View controller)에 모델-뷰(Model to View)간의 변환 코드를 넣을 수 있습니다. 그러나 뷰 컨트롤러는 이미 꽤 많은 일을 하고 있습니다. viewDidLoad의 처리 및 기타 뷰의 수명 주기 이벤트 처리, IBAction을 통한 콜백 처리 기타 여러 작업 등을 이미 뷰 컨트롤러에서 처리하고 있습니다.
이를 통해 개발자들이 농담으로 “MVC: Massive View Controller”라고 부르는 것에 대해 알 수 있습니다.

플레이그라운드(Playground) 예시
Xcode에서 새로운 플레이그라운드를 생성합니다.

예를 들어 애완 동물을 입양하는 앱의 일부로 “Pet View”를 만들 것입니다. 빈 플레이그라운드 파일에 다음을 추가합니다.
1
2
3
4
5
6
7
8
9
10
11
12
13
14
15
16
17
18
19
20
21
22
import PlaygroundSupport
import UIKit

// MARK: - Model
public class Pet {

    public enum Rarity {
        case common, uncommon, rare, veryRare
    }

    public let name: String
    public let birthday: Date
    public let rarity: Rarity
    public let image: UIImage

    public init(name: String, birthday: Date, rarity: Rarity, image: UIImage) {
        self.name = name
        self.birthday = birthday
        self.rarity = rarity
        self.image = image
    }
}
여기에서 Pet이라는 모델을 정의합니다. 모든 애완 동물에는 이름(name), 생일(birthday), 희귀도(rarity) 및 이미지(image)가 있습니다. 뷰에 이러한 속성을 표시해야 하는데 생일과 희귀도는 원시 데이터(raw data)를 직접 표시할 수 없습니다. 먼저 뷰 모델을 통해 변환해야 합니다.
플레이그라운드 끝에 다음 코드를 추가합니다.
1
2
3
4
5
6
7
8
9
10
11
12
13
14
15
16
17
18
19
20
21
22
23
24
25
26
27
28
29
30
31
32
33
34
35
36
37
38
39
40
41
42
43
44
45
// MARK: - ViewModel
public class PetViewModel {

    // 1
    private let pet: Pet
    private let calendar: Calendar

    public init(pet: Pet) {
        self.pet = pet
        self.calendar = Calendar(identifier: .gregorian)
    }

    // 2
    public var name: String {
        return pet.name
    }

    public var image: UIImage {
        return pet.image
    }

    // 3
    // You'll be able to display this value directly on a view without having to perform any other string formatting.
    public var ageText: String {
        let today = calendar.startOfDay(for: Date())
        let birthday = calendar.startOfDay(for: pet.birthday)
        let components = calendar.dateComponents([.year], from: birthday, to: today)
        let age = components.year!
        return "\(age) years old"
    }

    // 4
    public var adoptionFeeText: String {
        switch pet.rarity {
        case .common:
            return "$50.00"
        case .uncommon:
            return "$75.00"
        case .rare:
            return "$150.00"
        case .veryRare:
            return "$500.00"
        }
    }
}
위에서 수행한 작업은 다음과 같습니다.
- 먼저, 둘 다
init(pet:)내에서 설정하여pet및calendar라는 두 개의private속성(property)을 생성했습니다. - 다음으로,
name과image에 대해 두 개의 계산된 속성(computed properties)을 선언했습니다. 여기서 각각 애완 동물의 이름과 이미지를 반환합니다. 이것은 당신이 수행할 수 있는 가장 간단한 변환 방법, 즉 수정하지 않고 값을 반환하는 것입니다. 모든 애완 동물의 이름에 접두사(prefix)를 추가하도록 디자인을 변경하려는 경우 여기에서 이름을 수정하여 쉽게 변경할 수 있습니다. - 다음으로,
ageText를 또 다른 계산된 속성으로 선언했습니다. 여기서calendar를 사용하여 오늘 날짜와 애완 동물의 생일 사이의 연도 차이를 계산하고 이를 문자열 뒤에"years old"문구를 붙여 반환합니다. 예를 들면 오늘 날짜의 연도가 2021년이고 애완 동물의 생일은 2019년이라면"2 years old"라는 String을 반환합니다. 뷰에서 다른 문자열 형식화(formatting)를 수행할 필요 없이 이 값을 직접 표시할 수 있습니다. - 마지막으로, 희귀도에 따라 애완 동물의 입양 비용을 결정하는 계산된 속성으로
adoptionFeeText를 생성했습니다. 다시 말하지만 이것을String으로 반환하여 직접 표시할 수 있습니다.
이제 애완 동물의 정보를 표시하기 위해 UIView가 필요합니다. 플레이그라운드 끝에 다음 코드를 추가합니다.
1
2
3
4
5
6
7
8
9
10
11
12
13
14
15
16
17
18
19
20
21
22
23
24
25
26
27
28
29
30
31
32
33
34
35
36
37
38
39
40
41
// MARK: - View
public class PetView: UIView {
    public let imageView: UIImageView
    public let nameLabel: UILabel
    public let ageLabel: UILabel
    public let adoptionFeeLabel: UILabel

    public override init(frame: CGRect) {

        var childFrame = CGRect(x: 0, y: 16, width: frame.width, height: frame.height / 2)

        imageView = UIImageView(frame: childFrame)
        imageView.contentMode = .scaleAspectFit

        childFrame.origin.y += childFrame.height + 16
        childFrame.size.height = 30
        nameLabel = UILabel(frame: childFrame)
        nameLabel.textAlignment = .center

        childFrame.origin.y += childFrame.height + 16
        ageLabel = UILabel(frame: childFrame)
        ageLabel.textAlignment = .center

        childFrame.origin.y += childFrame.height
        adoptionFeeLabel = UILabel(frame: childFrame)
        adoptionFeeLabel.textAlignment = .center

        super.init(frame: frame)

        backgroundColor = .white
        addSubview(imageView)
        addSubview(nameLabel)
        addSubview(ageLabel)
        addSubview(adoptionFeeLabel)
    }

    @available(*, unavailable)
    public required init?(coder: NSCoder) {
        fatalError("init(coder:) has not supported.")
    }
}
여기에서 애완 동물의 image를 표시하는 imageView와 애완 동물의 이름, 나이 및 입양 비용을 표시하는 세 개의 다른 레이블이 있는 4개의 하위 보기가 있는 PetView를 만듭니다. init(frame:) 내에서 각 보기를 만들고 배치합니다. 마지막으로 init?(coder:) 생성자에서 지원되지 않는다는 것을 명시하는 fatalError를 발생시킵니다.
이 클래스들을 실행할 준비가 되었습니다! 플레이그라운드 끝에 다음 코드를 추가합니다.
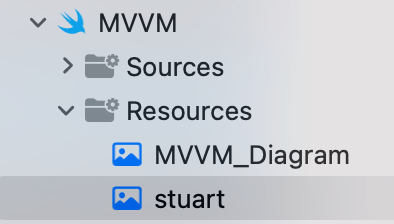
그 전에 플레이그라운드의 resource에 아래 이미지를 stuart라는 이름으로 추가합니다.
1
2
3
4
5
6
7
8
9
10
11
12
13
14
15
16
17
18
19
20
21
22
// MARK: - Example
// 1
let birthday = Date(timeIntervalSinceNow: (-2 * 86400 * 366))
let image = UIImage(named: "stuart")!
let stuart = Pet(name: "stuart", birthday: birthday, rarity: .veryRare, image: image)

// 2
let viewModel = PetViewModel(pet: stuart)

// 3
let frame = CGRect(x: 0, y: 0, width: 300, height: 420)
let view = PetView(frame: frame)

// 4
view.nameLabel.text = viewModel.name
view.imageView.image = viewModel.image
view.ageLabel.text = viewModel.ageText
view.adoptionFeeLabel.text = viewModel.adoptionFeeText

// 5
PlaygroundPage.current.liveView = view
수행한 작업은 다음과 같습니다.
- 먼저
stuart라는 새 애완 동물을 만들었습니다. - 다음으로
stuart를 사용하여viewModel을 생성했습니다. - 다음으로 iOS 공통
frame의 크기를 전달하여 뷰를 만들었습니다. - 다음으로
viewModel을 사용하여 뷰의 하위 뷰(subview)를 구성했습니다. - 마지막으로
PlaygroundPage.current.liveView = view를 설정하면 해당 뷰를 플레이그라운드가 표준 Assistant editor 내에서 렌더링되어 표시합니다.
이를 실제로 보려면 View ▸ Assistant Editor ▸ Show Assistant Editor를 선택하여 렌더링된 뷰를 확인합니다.
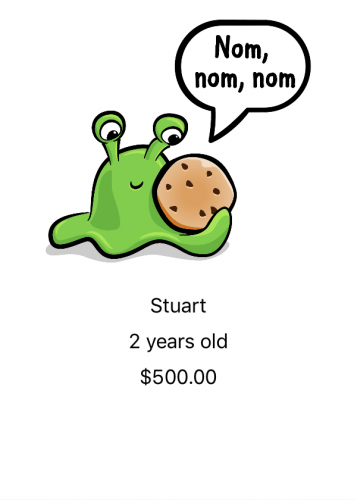
Stuart는 정확히 어떤 종류의 애완 동물입니까? 그는 물론 쿠키 몬스터입니다! 그들은 매우 드뭅니다(very rare).
이 예제에서 할 수 있는 마지막 개선 사항이 있습니다. PetViewModel의 클래스 닫는 중괄호 바로 뒤에 다음 extension을 추가합니다.
1
2
3
4
5
6
7
8
9
extension PetViewModel {
    public func configure(_ view: PetView) {
        view.nameLabel.text = viewModel.name
        view.imageView.image = viewModel.image
        view.ageLabel.text = viewModel.ageText
        view.adoptionFeeLabel.text = viewModel.adoptionFeeText
    }
}
이 메소드를 사용하여 인라인으로 수행하는 대신 뷰 모델을 사용하여 뷰를 구성합니다.
이전에 입력한 다음 코드를 찾습니다.
1
2
3
4
5
// 4
view.nameLabel.text = viewModel.name
view.imageView.image = viewModel.image
view.ageLabel.text = viewModel.ageText
view.adoptionFeeLabel.text = viewModel.adoptionFeeText
해당 코드를 다음으로 교체합니다.
1
viewModel.configure(view)
이것은 모든 뷰 구성 논리(view configuration logic)를 뷰 모델에 넣는(put) 깔끔한 방법입니다. 실제로 이 방법을 원할 수도 있고 원하지 않을 수도 있습니다. 하나의 뷰와 하나의 뷰 모델만 함께 사용하는 경우 뷰 모델에 configure 메소드를 넣는 것이 좋습니다. 그러나 둘 이상의 뷰와 여러 개의 뷰 모델을 사용하는 경우 뷰 모델에서 이러한 방법은 복잡하다는 것을 알 수 있습니다. 이 경우 각 뷰에 대해 별도로 구성 코드를 갖는 것이 더 간단할 수 있습니다.
출력은 이전과 같아야 합니다.
이봐 Stuart, 그 쿠키를 공유하시겠습니까? 아니? 앗, 어서…!
주의해야 할 사항은 무엇입니까?
MVVM은 앱에 모델에서 뷰로의 변환이 많이 필요한 경우 적합한 방법입니다. 그러나 모든 오브젝트가 MVVM에 깔끔하게 들어맞지는 않습니다. 대신 다른 디자인 패턴과 함께 MVVM을 사용해야 합니다.
또한 MVVM은 처음 애플리케이션을 만들 때 그다지 유용하지 않을 수 있습니다. MVC가 더 나은 출발점이 될 수 있습니다. 앱의 요구 사항이 변경되면 변화하는 요구 사항에 따라 다른 디자인 패턴을 선택해야 할 수 있습니다. MVVM은 앱의 제작 과정에서 나중에 정말로 필요할 때 도입해도 됩니다.
변화를 두려워하지 말고 미리 계획하십시오.
전체 코드
1
2
3
4
5
6
7
8
9
10
11
12
13
14
15
16
17
18
19
20
21
22
23
24
25
26
27
28
29
30
31
32
33
34
35
36
37
38
39
40
41
42
43
44
45
46
47
48
49
50
51
52
53
54
55
56
57
58
59
60
61
62
63
64
65
66
67
68
69
70
71
72
73
74
75
76
77
78
79
80
81
82
83
84
85
86
87
88
89
90
91
92
93
94
95
96
97
98
99
100
101
102
103
104
105
106
107
108
109
110
111
112
113
114
115
116
117
118
119
120
121
122
123
124
125
126
127
128
129
130
131
132
133
134
135
136
137
138
139
import PlaygroundSupport
import UIKit

// MARK: - Model
public class Pet {

    public enum Rarity {
        case common, uncommon, rare, veryRare
    }

    public let name: String
    public let birthday: Date
    public let rarity: Rarity
    public let image: UIImage

    public init(name: String, birthday: Date, rarity: Rarity, image: UIImage) {
        self.name = name
        self.birthday = birthday
        self.rarity = rarity
        self.image = image
    }
}

// MARK: - ViewModel
public class PetViewModel {

    // 1
    private let pet: Pet
    private let calendar: Calendar

    public init(pet: Pet) {
        self.pet = pet
        self.calendar = Calendar(identifier: .gregorian)
    }

    // 2
    public var name: String {
        return pet.name
    }

    public var image: UIImage {
        return pet.image
    }

    // 3
    // You'll be able to display this value directly on a view without having to perform any other string formatting.
    public var ageText: String {
        let today = calendar.startOfDay(for: Date())
        let birthday = calendar.startOfDay(for: pet.birthday)
        let components = calendar.dateComponents([.year], from: birthday, to: today)
        let age = components.year!
        return "\(age) years old"
    }

    // 4
    public var adoptionFeeText: String {
        switch pet.rarity {
        case .common:
            return "$50.00"
        case .uncommon:
            return "$75.00"
        case .rare:
            return "$150.00"
        case .veryRare:
            return "$500.00"
        }
    }
}

extension PetViewModel {
    public func configure(_ view: PetView) {
        view.nameLabel.text = viewModel.name
        view.imageView.image = viewModel.image
        view.ageLabel.text = viewModel.ageText
        view.adoptionFeeLabel.text = viewModel.adoptionFeeText
    }
}

// MARK: - View
public class PetView: UIView {
    public let imageView: UIImageView
    public let nameLabel: UILabel
    public let ageLabel: UILabel
    public let adoptionFeeLabel: UILabel

    public override init(frame: CGRect) {

        var childFrame = CGRect(x: 0, y: 16, width: frame.width, height: frame.height / 2)

        imageView = UIImageView(frame: childFrame)
        imageView.contentMode = .scaleAspectFit

        childFrame.origin.y += childFrame.height + 16
        childFrame.size.height = 30
        nameLabel = UILabel(frame: childFrame)
        nameLabel.textAlignment = .center

        childFrame.origin.y += childFrame.height + 16
        ageLabel = UILabel(frame: childFrame)
        ageLabel.textAlignment = .center

        childFrame.origin.y += childFrame.height
        adoptionFeeLabel = UILabel(frame: childFrame)
        adoptionFeeLabel.textAlignment = .center

        super.init(frame: frame)

        backgroundColor = .white
        addSubview(imageView)
        addSubview(nameLabel)
        addSubview(ageLabel)
        addSubview(adoptionFeeLabel)
    }

    @available(*, unavailable)
    public required init?(coder: NSCoder) {
        fatalError("init(coder:) has not supported.")
    }
}

// MARK: - Example
// 1
let birthday = Date(timeIntervalSinceNow: (-2 * 86400 * 366))
let image = UIImage(named: "stuart")!
let stuart = Pet(name: "stdart", birthday: birthday, rarity: .veryRare, image: image)

// 2
let viewModel = PetViewModel(pet: stuart)

// 3
let frame = CGRect(x: 0, y: 0, width: 300, height: 420)
let view = PetView(frame: frame)

// 4
viewModel.configure(view)

// 5
PlaygroundPage.current.liveView = view